Windows PCs typically slow down as applications are installed and used. Whether you are using a word processor, writing a spreadsheet, surfing the internet, playing games or anything else, hard drives fill with temporary files that do not always get removed when no longer needed. Hard disks can succumb to this wear and tear over time. Read on to learn of ways to help keep a PC running smoothly.
1. Clean up the Desktop
- Empty Recycle bin – see below
- Only have short cuts on your desktop (they should look similar to below … the little blue arrow indicates a shortcut). If there is no arrow, it isn’t a shortcut.
Move all files stored on the desktop that don’t have the shortcut symbol to a folder in your Documents folder (you can create a shortcut, if you want quick access to it, on your desktop)

2. Empty the Recycle Bin
Simply deleting files from the disk doesn’t really delete them at all; rather they are moved to a temporary holding area on the hard drive for easy restoration. This area is called the Recycle Bin and is usually displayed on the Desktop. Review the contents before emptying. Once emptied, the space on the hard drive that the data occupied is made available for reuse and the restoration of any files emptied from the recycle bin becomes extremely difficult if it is overwritten by new data. Note that this will only speed up your computer if the hard drive is nearly full.
3. Log onto Windows Safe Mode
Windows’ Safe Mode is a boot option that only loads the operating system with absolutely necessary basic files and drivers. It is generally used to troubleshoot issues in Windows, as many components, such as graphic drivers or software that automatically start with Windows, are not loaded.
To start in Safe Mode you need to reboot your computer.
Repeatedly and gently tap the F8 key as Windows begins to boot. (This is the usual key you press, if that doesn’t work try Shift+F8, if that doesn’t work you will need to Google your brand of computer asking how to start in safe mode) If you see the Windows logo, you missed the right time point; just start over. Once you see Advanced Boot Options you know that it worked. Use the arrow keys on your keyboard to select Safe Mode from the options and press Enter to boot into Safe Mode.

If your computer no longer appears sluggish when you are in Safe Mode, you can assume that your hardware is fine. A trouble-free Safe Mode is an indicator that a software issue is the source of problems you normally see. There are still many candidates, for example a driver or software conflict, malware, or simply too many programs launching at startup.
Note: Accessing Windows 10 Safe Mode is a bit different – see http://windows.microsoft.com/en-au/windows-10/start-your-pc-in-safe-mode for details.
4. Freeing Up Resources
Stop all unneeded background processes.
Look at the right corner of your Taskbar, to the left of the time, date, and essential system icons. You will see a group of small icons, collectively called the ‘notification area’ or ‘system tray’.

Each of these icons represents a program that has been at least partially started or is running “in the background”. Regardless of state, each causes a reduction of available memory and processing power, or resources.
Closing, exiting or cancelling any unused background process returns those resources to the system, and becomes available for use by the application(s) started specifically by the user.
Go to your task manager and click on the Process tab. To access the Task Manager, you will want to hold down CTRL and ALT keys, then tap the DEL simultaneously, then click on the task manager button in the window that appears. This will show you what processes are using your computer (If you aren’t sure what the process does, Google it and see whether it is important or not to the running of your computer)
A utility is built into Windows that can enable/disable task bar programs and processes from automatically loading with Windows at Startup
To access it, go to Start > Run > type in “MSCONFIG” and click OK.

You may need to choose the Start-up tab (Windows 10 does it differently. From the taskbar, search System Configuration. Select the top result, System Configuration desktop app.)
If you do not know what a process does, search its name. Do not disable processes if you are unsure, as some processes are necessary for your computer to function normally. You can stop applications like Skype, your printer applications, camera updaters etc from being automatically loaded at start-up. Applications like your antivirus software need to be loaded at start-up.
5. Install anti-virus software and keep it current
Today, anti-virus (AV) suites are an absolute must. There are many from which to choose at the software store, but there are free AV solutions that do a very good job, too. Three popular free AV solutions are Avast!, AVG, and Avira AntiVir. All include regular “virus definition” file updates that allow the AV program to detect and protect from the latest viruses being released. Note that while installing antivirus software actually slows down your computer, it does not slow it down as much as a virus does. Here is a 2016 review of Antivirus Software and Apps (http://www.tomsguide.com/us/best-antivirus,review-2588-5.html)
6. Install Malwarebytes and check your computer for malware
Malware is short for malicious software. It is a piece of software, such as a virus, adware, or a worm, that you did not authorise to install but it eats up your system’s resources. It can decrease your systems performance, like any other running software, and can also compromise your operating system. Download the free version here https://www.malwarebytes.org/ Read the installation screens and make sure you UNTICK the option for a free trial.
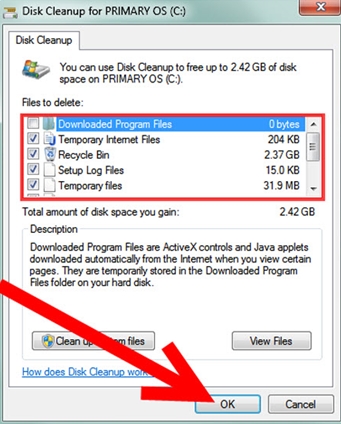
7. Clean up the primary partition
Click “Start” type “Disk Cleanup” and press “Enter” key. Select your primary partition (Windows installed drive, in most cases C:/ drive) and scan it for junk files. After few minutes, it will show a list of unnecessary files and simply select all these check boxes and start cleaning your drive.
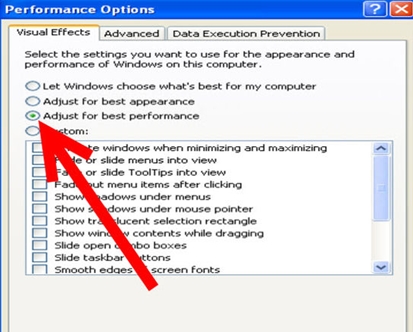
8. Desktop Services
Turn off unneeded Desktop Features that try to make things look better. The fancy rounded window corners, the way the menus fade in and out, and the 3-D button styles on modern Desktops all require some computing power and can overwhelm older machines. To turn off these appearances only enhancements:
Vista – Click the Start button, then Control Panel, then choose System and Maintenance, then Performance Information and Tools. Click Adjust visual effects. If you are prompted for an administrator password or confirmation, type the password or provide confirmation. Click the Visual Effects tab, and choose “Adjust for best performance”. You can also try the “Custom” option, and turn on and off individual settings to see which ones will work without slowing your machine down.
Windows 7 – Click the Start button, then Control Panel, and then System and Security. When you see System, click on it and then Advanced system settings. From here you can make sure you’re on the Advanced tab and click on Settings under Performance. Here, you can also choose Adjust for best performance or choose Custom if you’d like to compromise between fancy visuals and performance. On a side note, this menu can be accessed much quicker by right-clicking on Computer, from either the Desktop or Start menu, selecting Properties, and then Advanced system settings.
Windows 8 and 8.1 – Search for “adjust visual” in Windows 8 Start menu, Choose “Adjust the appearance and performance of Windows”, Click “Settings” then select “Adjust the appearance and performance of Windows” in the Settings are in the top left, Select “adjust for best performance” in the Performance options box that appears. Then Click Apply.
9. Uninstall all applications that are no longer needed.
When applications and games are installed to a Windows PC, some files are written in the Windows directory structure and dozens (or more) changes are made to the Windows Registry file. Most of these changes are not readily apparent to the user, so proper removal requires uninstalling the application through the Control Panel’s “Add or Remove Program” or “Programs and Features” icon.
If the program is not listed in the Control Panel use the “uninstall” command provided by the application.
Please note: Simply deleting the entire application directory is not the same as uninstalling, as all the files written to the Windows directory and changes to the Windows Registry file will remain and may be reloaded when the system is rebooted.
Make sure that you do not uninstall any programs that are required by others. e.g. iTunes® will not work if Quicktime® is uninstalled, and many programs rely on other Microsoft programs.
10. Do a Cold Boot
(only necessary if you didn’t do the Safe Boot above)
Do a shutdown/reboot also known as a cold reboot. Some programs do not release memory properly when they close, which is the case for some operating systems. Even doing a warm restart will not release some of the memory drivers and other core programs had allocated. The computer has to be completely shut down and then restarted. When a program is asking for some memory, a space would be allocated for it by the operating system (like Windows). This allocated memory cannot be used by any other programs. “Well-behaved” programs typically let go of their hold of this memory space but some programs don’t – this is known as a “memory leak”, which is caused by a programming error. A memory leak is easily evident when a program uses up an abnormally high amount of resources because it keeps on asking for more and never gives back any of the allocated memory space. The user workaround is to terminate the program or process, but some processes and core processes cannot be closed. Shutting down the system will have the operating system forget which memory locations aren’t free, so on the next boot, all memory locations are free to use.
Be realistic.
The “high end” computer purchased as new 5 years ago may run the latest version of Windows, but that doesn’t mean that it will do it very well. Keep in mind that the Minimum System Requirements on the software box is indeed, minimum. The best experiences usually require that the system is configured to Recommended System or better, instead. Technology marches on and it seems there is a game of “one-upmanship” played between software developers and hardware designers. Regardless, eventually new software will require new hardware or vice versa. It seems that the amount of frustration you can endure best determines how long you will run your current setup.
Tips
Be aware that some of these steps are specific to a specific version of Windows; not all are cross-compatible.
- Keep malware in check. If running utilities mentioned in this article gives you an “Access Denied”, “You don’t have rights to run this”, or the program will not run, you probably have a malware infection. Symptoms other than these are frequent phony, but realistic-appearing, anti-virus warnings that your system is infected, or your web browser sending you to pornographic websites or search sites you have not configured it to send you to.
- Consider the use of an Adblocker in conjunction with your browser. An Adblocker may improve speed and appearance of pages displayed by your browser. Check that the Adblocker does not disrupt valid site pop-ups for the sites you visit. See https://en.wikipedia.org/wiki/Ad_blocking
- Add memory. While not free, adding memory is a very effective way of boosting performance, especially if your system has 1 GB of memory or less. Increasing the amount of memory installed reduces the need for the computer to write to and read from the hard drive. Check the motherboard or system documentation to determine size, type, speed and permissible configurations of memory before purchasing and installing additional memory. Systems with lower amounts of memory (256 MB to 1 GB) installed receive the greatest boost when increased to 2 GB or more (as this represents a 100-400% or more increase in system memory). Systems that have 2 GB or more memory installed also receive a boost – but it is less noticeable.
- Keep your PC cool. When a computer gets too hot, the CPU fan will speed up. If the CPU is still too hot, the CPU will enter something called “thermal throttling” which slows down processing speed in order to prevent the CPU from breaking down. Turning off or hibernating your PC when not using it, increasing airflow, and keeping the room which your PC is located in cool will help keep your computer cool — and fast.
- Keeping Windows Up-to-date, especially with Security Updates, is very important and can prevent BADWARE infections which slow a computer.
- Consider re-installing Windows. It may be easier to format the hard drive and re-install Windows on the computer. Be sure to back up important data first and have all program installation disks ready for re-installation. Be aware that the format process will delete all files on the disk. This means that you will need to reinstall all software and restore all documents from a backup. This can take days!
- Consider using a different operating system. If you have a slow or old computer considers switching to Linux. This has its own set of issues such as needing to learn a new Operating System, and much more.
Warnings
- Do not delete unknown types of files, because they may be System Programming Files.
- Discharge any static electricity. Touch an electrically grounded source (a heating or plumbing pipe or the metal case of an electrical device powered by a grounded 3 prong cord connected to a grounded receptacle) prior to touching components inside the PC case. Static electricity can pass through hands and could cause delicate electronics inside the PC case to fail.
- Beware of using MSConfig. Using MSConfig as anything but a troubleshooting tool is considered dangerous by many in the IT field to long term computer stability. If you’re unsure of something do your research and don’t remove it until you know for sure you don’t need it. You can always uncheck it and come back later.
- Download files from trustworthy sources. The developer’s page is best; P2P, newsgroups and anonymous file hosting sites are more likely to be infected with a virus.
- Do not download any software which tells that they will speed up your computer. More downloads can also cause your computer to slow down as they (software) put more load on your PC’s processor and eat up its RAM.
- Shut down your computer and disconnect all the cables from it prior to opening the case. This eliminates the chances of electrocution or damage to system components.
- Do not use registry cleaners. Registry cleaners can be dangerous. They may seem legitimate, but after some amount of usage, they can fragment your registry. Leave them alone, if you feel that it must be cleaned up, make a backup and defragment afterwards. The registry does not need to be cleaned, so cleaning it can only result in nothing, or damage.
Other things to try ….
Run “Error Checking” on all hard drives.
Right-click a drive icon in “My Computer” and select “Properties” followed by “Tools”. Choose “Error Checking” to let the utility scan the drive for damaged files that can contribute to slow drive access speeds. This process may take several minutes to hours or more to complete. Warning: Do not do this if you have an SSD. (solid-state drive)
Run “De-fragment” on all hard drives.
Right-click a drive icon in “My Computer” and select “Properties” followed by “Tools”. Choose “De-fragment” to let the utility clean up fragmented files and consolidate free space on the drive. Note: this is not needed on an SSD drive. This process may take anywhere from several minutes to hours or more to complete depending on size of the drive(s) and amount of unused capacity or free space. Consider starting the defragment process so that it will run overnight or prior to logging off. You may have to disable your screensaver as well. After completion the speed of hard drive read and writes times may improve significantly. Warning: Defragmenting an SSD will yield no performance gains, and can actually damage the SSD.
Set your computer’s energy settings to High Performance.
This is especially useful in Laptops and Netbooks where the processor speed is altered in accordance to energy settings (and if you are running on battery power).
*Please note, while all care has been taken in compiling BIRRR documents, we recommend that you check with a professional if you are unsure.