Mobile Broadband Modems

A modem is a device that allows access to the internet.  Some of the modems listed below are also routers, meaning they supply a wifi connection for use with multiple devices.

Optus

 Optus 4G Home Wireless Broadband

500GB $75/mth 24 Month Contract or Month to Month ($216 modem up front charge)

Must have Optus 4G coverage. Signal and speed may be improved by adding an antenna to the modem. To check availability at your address click here

Optus 5G Home Internet

Unlimited Data $70/mth 24 Month Contract or Month to Month ($200 fee)

Must have Optus 5G coverage. Signal and speed may be improved by adding an antenna to the modem. To check availability at your address click here

Optus Portable PrePaid Devices

Screen Shot 2020-08-02 at 5.27.00 PM

Must have Optus coverage. Signal and speed may be improved by adding an antenna to the modem (check specifications to see which devices have antenna ports and for further details on available plans).

Telstra

Telstra 5G Wi-Fi Pro

Screen Shot 2020-08-02 at 5.49.07 PM

200GB $99.95/mth (includes modem) or $75/mth (no modem) 24 Month Contract

Must have Telstra 5G coverage. Signal and speed may be improved by adding an antenna to the modem. Telstra currently offers 5G in select areas and is progressively rolling it out to other areas. In non-5G coverage areas, you’ll automatically switch to 4G or 3G. Check coverage at telstra.com/coverage

NETGEAR 4G Nighthawk® M2

Screen Shot 2020-08-02 at 5.54.37 PM

200GB $91.00/mth (includes modem) or $75/mth (no modem) 24 Month Contract

Must have Telstra 4G coverage*. Signal and speed may be improved by adding an antenna to the modem.

NB: In BIRRR’s experience these modems do not perform well in 3G only areas

The Telstra Mobile Network offers 4GX in all capital CBDs and selected suburban and regional areas and is progressively rolling out to more places. In other coverage areas around Australia, you’ll automatically switch to our fastest available 4G or 3G. Check coverage at telstra.com/coverage

Telstra PrePaid Portable Devices

Screen Shot 2020-08-02 at 6.00.37 PM

Screen Shot 2020-08-02 at 6.03.17 PM

Wireless internet devices, which include a Pre-Paid SIM card (already inserted). For plan and device details click here

Vodafone

Vodafone Pocket WiFi® 3 4G

Screen Shot 2020-08-02 at 8.18.04 pm150GB $67.50/mth (includes modem) – 12 month contract

Must have Vodafone coverage (heck your coverage with the Coverage Checker). Modem and plan specifications are detailed here. Also available as a PrePaid device.


Huawei WiFi Cube 2 4G

Screen Shot 2020-08-02 at 8.39.34 pm


150GB $78/mth (includes modem) – 12 month contract

Must have Vodafone coverage (check your coverage with the Coverage Checker). Modem and plan specifications are detailed here.


NB Tec

NB Tec are a solutions specialist, their Longreach Modem solution is a  modem/antenna & booster in one that can connect to Telstra, Optus or Vodafone mobile networks.

Mobile Signal Enhancement

The above modems from carriers can be used in conjunction with a repeater and / or antenna to increase signal strength and speed.

Telstra Repeaters

Cel-Fi Repeaters for all Carriers

Equipment Suppliers, Installers & Specialists

*Please note, while all care has been taken in compiling BIRRR documents, we recommend that you check with your service provider, regarding your own connection issues and required equipment and plans.

Updated 01/08/2020


Cel-Fi Repeaters

Active antennas or repeaters boost the 3G/4G signal.  Repeaters such as these that require power to the unit (Telstra Smart Antennas & Nextivity Cel-Fi Repeaters) require licensing.  If they are not licensed they are ILLEGAL boosters.

Illegal boosters carry a large fine as they can interfere with the mobile network.

” It is an offence under the Radiocommunications Act 1992 (the Act) to operate an unlicensed radiocommunications device, or possess this device for the purpose of operation. A person found guilty of this offence may be imprisoned for two years for each offence. A body corporate may receive a penalty of up to $270,000 (1,500 penalty units) per offence (sections 46 and 47 of the Act). Other penalties may apply, such as the interference offence provisions at Part 4.2 of the Act.” ( ACMA )

NB: Cel-Fi Pro and GO Repeaters and Telstra Branded Smart Antennas/Cel-Fi Go are the same devices, with the Telstra supplied one being different in colour, with Telstra branding.

Powertec Telecommunications are the only approved importer of the Nextivity Cel-Fi (outside of Telstra’s branded Smart Antenna). There are many resellers however, check our suppliers page for further info. The below repeaters & the Telstra branded repeaters are the ONLY licensed and legal repeaters that can be legally used in Australia.

CEL-FI Pro

Cel-Fi pro is an indoor smart signal repeater. Available for the Telstra, Optus or Vodaphone networks.

Screen Shot 2020-08-02 at 3.26.12 PM
Cel Fi Pro available for the Telstra, Optus or Vodafone Networks.

To help with setting up a Cel-Fi Pro or Smart Antenna visit the Cel-Fi page here or see the notes below. To purchase a Cel-Fi Pro in Australia, help with installation and compatible antenna advice visit Powertec

CEL-FI Go Stationary

Cel-Fi Go Stationary is a smart signal repeater. Available for the Telstra, Optus or Vodaphone networks. This multi-band solution is ideal for use in commercial properties, government buildings, agricultural settings, small manufacturing operations, rural areas, businesses, and large homes. To help with setting up a Cel-Fi Go Stationary visit the Cel-Fi page here. To purchase a Cel-Fi Go Stationary in Australia, help with installation and compatible antenna advice visit Powertec

Screen Shot 2020-08-02 at 3.28.22 PM
Cel-Fi Go Stationary

BIRRR highly recommend using surge protectors with the Cel-Fi Pro and Go Stationary devices and a UPS unit to power the repeater during general mains power failures or when the generator is off. They’re designed to power a desktop for 15 minutes or so, but are large enough to power a CelFi repeater for much longer.

CEL-FI Go Mobile

Screen Shot 2020-08-02 at 3.37.43 PM
Cel-Fi Go for vehicles

The Cel-Fi GO/GO+ is a Smart Signal booster for addressing the challenge of poor cellular coverage on the road. Ideal for vehicles and boats, a suitable antenna is needed and these are recommended to be installed by a professional. To purchase a Cel-Fi Go in Australia, help with installation and compatible antenna advice visit Powertec

NB:  Extension devices are carrier specific, if you require coverage across multiple carriers then you will need multiple models. 

Screen Shot 2020-08-02 at 4.31.42 PMCel-Fi Pro Installation Tips

Details on using the Wave app are available from Powertec here

Installation tips below thanks to Marcus Dowling from Rising Connection

Screen Shot 2020-08-02 at 4.17.16 PM

You may like to have two very long power extension leads to help with this while you move the CU & NU around find the best locations.

  1. Before powering up the units, walk around your property and look for both the strongest and weakest signal on you mobile. This is important, with the Cel-Fi units, if the CU (Coverage Unit/Smaller box) picks up too much signal, it will automatically back its ability off, so find the areas where you get “BAD” signal (preferably none) as options as to where you will put the CU.
  2. (skip if not using an external antenna) Choose two locations where you are not getting good signal, if the NU (Network Unit/Bigger box) can pick up enough signal with its internal antennas, it will by default ignore the external antenna, the NU has several very decent size antennas in it, way better than any normal mobile phone has.
  3. (skip if using an external antenna) put the NU (Network Unit/Bigger box) where you can find your strongest signal as in #1, that could be outside, just make sure the unit is protected from the weather and elements, the NU has several very decent size antennas in it, way better than any normal mobile phone has. Look to see that you are getting as many bars as possible (with the CU switched off) on the NU. The better you get the signal onto the NU, the better the CU will work in the next steps.
  4. Performance wise the NU & CU work best at around twenty (20) meters between them, this will vary depending on your building, some could be over 40 meters, some less then 15 meters, so place the CU now away from NU progressively looking at getting the number for the NU as high as possible, then take it that bit further where it fails (to far from the NU), it is good to know how far you can push the CU. Now the distance you took the CU to where it failed, use that as a guide to bringing the CU back into range, then bring the CU back some more, the CU will be more stable close than further away, when the CU is on the fringe, it can drop out causing your mobile connection to fail intermittently.

Just using these steps often achieves better performance than the performance specifications given for the Cel-Fi.

*Please note, while all care has been taken in compiling BIRRR documents, we recommend that you check with your service provider, equipment provider and installer regarding your own connection issues and equipment needed. Please ensure that any installer is accredited and licensed and that any equipment is legal to use in Australia.

Updated 1st August 2020

Controlling Internet Data Usage with Gargoyle Router

Are you regularly running out of internet “downloads” or data? Kids keep on using it all? Not sure where it’s going?
This document describes the process of setting up a “Gargoyle” Router to enforce data usage quotas for each device on your computer network.
Unfortunately, due to the many variables of different internet connection types and equipment types, it is not simple to give a single step-by-step guide, but this may hopefully help some of you out, even if you have to get a computer tech in to set it up for you.
There is a New Zealand company selling Gargoyle routers (posted to Australia), and will help you set them up if you pay for their time.
http://www.portable.geek.nz/
These Gargoyle routers will allow you to set quotas limiting how much data each device on your network can use over a given time period, so as to ensure you do not use all of your monthly internet allowance. You can see how much data each device is using, and set limits for each device. These limits can reset every hour, every day, every week, or every month, and can be set differently for different devices on your network.
The Gargoyle program is free, and can be downloaded from Gargoyle , however you need a special router to put it on, and this can be a bit tricky for those who are not experienced with computer networking.
IMPORTANT – PLEASE READ: You, and you alone are responsible for what you do with this information. It has the potential to stop your internet from working, and to destroy your new Gargoyle router. BIRRR & I are not responsible for this, and cannot necessarily help you fix any problems occurring as a result of this. This is complicated stuff, and you may need help from an experienced computer tech to get it working.
Due to the large amount of possible modems, routers and network types, I cannot give step-by-step instructions for every router available. However the Gargoyle website provides some instructions for the TP-Link TL-WR1043ND Router, which is fairly cheap (about $70) and can be purchased from many online retailers, and maybe your local computer shop or IT Technician, who may also be able to assist you with the setup. (But they quite likely will not know of Gargoyle, so you would have to show them the website – http://www.gargoyle-router.com)
Types of Modems/Internet connections
Your setup will also vary depending on the type of internet connection you have. BEFORE YOU START, take note of how everything is plugged in and connected together. Draw pictures, write notes, take photos, whatever is needed to help you put it back as is if you run into trouble.
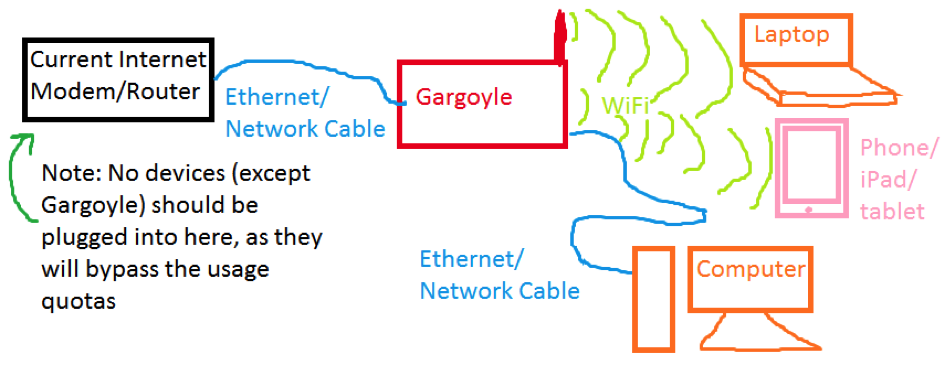
If you have a modem or router that has an Ethernet port (to take a cable that looks like this),

cable

then it is reasonably easy to make work. If you have satellite, ADSL, Next G Wireless Loop or a Telstra/Bigpond Network Gateway, this is what you should have. When you are finished, It will all be plugged in like this:

gargoyle 1
If not, you will likely need the assistance of someone experienced with computer networking, so I will attempt to provide some examples of how to set it up for them to follow.
If you have a 3G/4G USB Dongle, you will need to get a router to connect the USB dongle to. This will be another separate piece of equipment to purchase. Check out http://ofmodemsandmen.com/ If you do this, you would then end up with the scenario in the drawing above, and can continue setting up Gargoyle. Alternatively, and preferably, if your Gargoyle router has a USB port, you may be able to connect the USB dongle directly to the Gargoyle Router, and use it as the internet source. I have done this once, and it worked quite well. However, Some routers will not supply enough power to the USB dongle for this to work reliably.
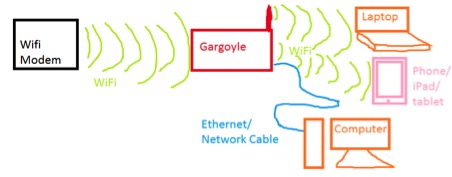
You may also have a wifi only device, like the Telstra 4G Wifi modems. I have never tried this, but you should be able to set it up like this:

gargoyle2

Getting Gargoyle installed onto a router

You cannot just use any router, and this page has some links to different options: Gargoyle Router

But, for the sake of this document, let’s go with the TP-Link TL-WR1043ND – it can be purchased from many Australian retailers, look here for places to order it from: Static Ice

There are currently three versions of the TP-Link TL-WR1043ND router, V1.x (old), V2.1 (current) and 3.0 (current). Version 2.1 and V3.0 are identical in appearance.

Version 1 is the oldest. Version 2 is newer and is well proven. Version 3 (latest), may be problematic, as it is not yet directly supported by Gargoyle (at Jan 2016). When buying the TP-Link TL-WR1043ND, check with your supplier to determine which version they can supply.

Note: Here is a link to other routers which run Gargoyle:
https://www.gargoyle-router.com/wiki/doku.php?id=supported_routers_-_tested_routers
It is recommended to select one of the newest routers with a fast CPU and larger RAM / Flash Memory. Atheros AR71XX based Routers have a proven track record with Gargoyle.

You must download and install the specific Gargoyle file for the router you have / bought.
https://www.gargoyle-router.com/download.php
Select the file which ends in … squashfs-factory.bin. This is the correct .bin file to flash your factory firmware router.

For a V1, get this file: V1 FILE   – clicking on file will automatically download it

For a V2, get this file: V2 FILE – clicking on file will automatically download it

Each of these files are about 8mb in size, and should only take, at most, about 5-20 minutes to download, unless your internet is really, really slow.

  1. Save this file onto your computer.
  2. Physically unplug your computer from the internet, or disconnect the wireless.
  3. Connect the router to the power, and to your computer with the supplied network cable:cable
  4. Open up the webpage that controls the router, which should be at either of these addresses: Address 1  or Address 2 – try each of them.
  5. Next, on the menu on the left side of the screen, click System Tools, then Firmware Upgrade. Then click browse, and choose the file you downloaded earlier. Then click Upgrade. (If you get the error message “please choose a file to upgrade”, then rename the firmware file to something shorter (i.e. “gargoyle.bin”) and upload it again)
  6. Wait about 5 minutes then you should be able to open the website http://192.168.1.1/
    If after 5 minutes 192.168.1.1 won’t open, restart both the Gargoyle router and your computer and try again. To restart Gargoyle, just pull the power cable out, then plug it back in. If this doesn’t work, you are going to need to get help from someone experienced with computer networking. Or you can try repeating everything you did earlier.
  7. The Gargoyle website provides a detailed procedure for the initial configuration of your new Gargoyle router. See http://www.gargoyle-router.com/wiki/doku.php?id=getting_started.
    The following steps take you briefly through this procedure.
    1. Log into 192.168.1.1 via your browser. It will ask for a password. The password is password, so type it in and login.
    2. Once logged in, you should see a screen that looks similar to this:
      GargoyleRouterHomePageScreenshot
    3. Click the Connection button on the left side menu.
    4. In the Internet/WAN section, you need to choose DHCP (wired) if Gargoyle is to be connected to your modem via a network cable. This is the default setting and will work with all nbn™ NTU or modem connections scenarios. Choose DHCP (wireless) if it is to be connected by WIFI.
    5. You must turn on and secure the WIFI. Use WPA2 PSK security, set the Access Point SSID (the WIFI name) and the Wireless Channel. Default is Ch 11 is fine. The remainder of the default settings should not need attention at this time.

Plugging it into your computer network

Once that is done, you can connect Gargoyle to your internet modem (either by LAN cable or wirelessly), and connect your computers and other devices, either by cable or WIFI, to Gargoyle, instead of the original modem.

If it is all done right, you should be able to connect to the internet; in which case you are almost done.

NOTE: No devices should be connected directly to your old modem, as they will be bypassing Gargoyle’s quotas. You may need to turn the WIFI off on your old modem, or change the password, to keep kids (and big kids) from bypassing Gargoyle. If there is no connection, re-check everything you have done. Maybe get someone else to have a look, as it is easy to get frustrated and confused, and overlook simple things. Failing that, you may have to get a computer tech to look at it. But, in the meantime, you should be able to go back to your old setup.

Setting up quotasGargoyleSideMenu

But before you do that, you may wish to use Gargoyles bandwidth monitoring feature to determine just which computers on your network are using data and when. See https://www.gargoyle-router.com/wiki/doku.php?id=bandwidth_usage

Now you just need to setup your quotas.

Open the gargoyle router page at http://192.168.1.1 and login. Then, click Firewall in the left side menu, then click Quotas.

Once again there is a good Gargoyle website explanation for setting quotas. See http://www.gargoyle-router.com/wiki/doku.php?id=quotas

The Quota page has a variety of options. Have a play around and set it up as you want. Then click Save Changes. Sometimes you may have to restart the Gargoyle for it to take effect. To do this, navigate to System then Reboot or pull out the power cord, count to 10, then plug it back in.

To monitor the quotas, click Status on the left side menu and then click Quota Usage. This page will show you in real time, how much each device has used.

That’s about it. I hope this helps out some of you.

I am sorry I can’t give more specific instructions. Dependant on your equipment and users there are many variations for how it could be configured.

Here is an interesting read on a similar project using Gargoyle on a satellite service in the USA: http://raisedbyturtles.org/limiting-daily-bandwidth-on-home-router

Prepared by Nick Marlow from Mitiamo IT for BIRRR 4/11/2015 – Updated 6/06/2016.

*Please note, while all care has been taken in compiling BIRRR documents, we recommend that you check with your own IT consultant regarding this and other latest programs and equipment.

Telstra Coverage Extension Devices

If you can get some Telstra mobile coverage at your location a Telstra Extension Device may assist you in boosting your signal.

Screen Shot 2020-08-02 at 11.35.56 AM

Network coverage extension devices amplify the network signal your mobile device receives, which extends the area that your device can work in.

This devices can help you connect to the Telstra Mobile Network from further away than normally possible, or in areas where signal may struggle to penetrate – such as indoors, or in hilly or dense terrain.

CHECK TELSTRA COVERAGE HERE  

Mobile broadband network coverage extension devices are also known as ‘repeaters’ as they repeat the signal from one location to another.

In contrast, network coverage extension devices that connect directly to a mobile device are often called external antennas. They are described by their power or ‘gain’, which is a measure of how much they can amplify the mobile signal.

Both of the Telstra Go Repeater and Telstra Smart Antenna products below have been tested, authorised and approved by Telstra for use on the Telstra Mobile Network.

Telstra will be switching off 3G in 2024. With this in mind BIRRR does not recommend spending large amounts of money on boosting 3G service. 3G is being replaced with 4G (if spending any money on antennas or repeating equipment please ensure these are 4G compatible) and also be aware that boosting 3G service may not deliver faster speeds or reliability.

NB:  Extension devices are carrier specific, if you require coverage across multiple carriers then you will need multiple models. This page lists only Telstra branded extension devices.

Telstra Network Coverage Devices:

This slideshow requires JavaScript.

Telstra Smart Antenna RRP $1080

Telstra Go Smart Vehicle Mobile Repeater RRP $864

Telstra Go Stationary Repeater RRP $816

*Professional installation may require additional charges. Prices correct as of 1st August 2020.

BIRRR highly recommend using surge protectors with these devices and a UPS unit to power the repeater during general mains power failures or when the generator is off. They’re designed to power a desktop for 15 minutes or so, but are large enough to power a CelFi repeater for much longer.

** After 3G switch off these devices will continue to operate but only with 4G (700 MHz, 1800 MHz).

Telstra Recommended Antennas:

This slideshow requires JavaScript.

For further information on Telstra recommended extension devices or to have them professionally installed contact the Telstra Mobile Assurances Team:

Phone: 1800 305 307

or visit Telstra Network Extension Devices

Contact the Telstra Regional Australia Team if you require help with coverage at your address and to check your options for mobile extension devices.


The above information has been provided by discussions with Telstra, other service providers also offer solutions for boosting signal strength, please be aware that these must be registered devices.  It is best to contact your service provider directly.  Illegal boosters carry a large fine as they can interfere with the mobile network.

” It is an offence under the Radiocommunications Act 1992 (the Act) to operate an unlicensed radiocommunications device, or possess this device for the purpose of operation. A person found guilty of this offence may be imprisoned for two years for each offence. A body corporate may receive a penalty of up to $270,000 (1,500 penalty units) per offence (sections 46 and 47 of the Act). Other penalties may apply, such as the interference offence provisions at Part 4.2 of the Act.” ( ACMA )

REPORT A PROHIBITED DEVICE ~ If you are aware of anyone having these prohibited devices, you can:

  • call the ACMA’s customer service centre on 1300 850 115
  • email ACMA at info@acma.gov.au

Footnote: All information compiled from BIRRR discussions with Telstra and Telstra website and is current as at 1st August 2020.