Reducing Data Usage on iDevices

One of the most-often asked questions on the BIRRR facebook page is ‘How can I save data? It seems to be vanishing without me doing anything!” While sending photos and uploading big documents are often unavoidable as we conduct business via the internet and can eat into our data limits, there is actually quite a lot we can do to curtail some of the often-unseen big data users chewing through our very limited monthly gigabytes.

Many of the things you can do to manage data usage are

  • Save data in iOS
  • Track how much data you use
  • Stop Apps from using your data
  • How to see which Apps are using data
  • To save cellular data and use WiFi, turn off cellular data
  • Turn off autoplay in Facebook
  • Manage how you use Facetime
  • Manage how you use iCloud
  • Manage how you use iTunes
  • Manage data roaming
  • Use Safaris reading list to read articles offline
  • Manage the data guzzler Photo Stream
  • Turn off push notifications
  • Manage how you get emails
  • Stop Background App refresh
  • Manage WiFi
  • Use WiFi Hotspots

Solutions to the above data usage savers can be found here

Whether you use mobile or satellite broadband, if you own iDevices this is a short checklist to follow (as well as doing what is mentioned above)

 I-DEVICES

Operating system updates for Apple iOS are AUTOMATIC if you are connected via WiFi or cable. If the device is Cellular only, it is NOT automatic, and can be scheduled.

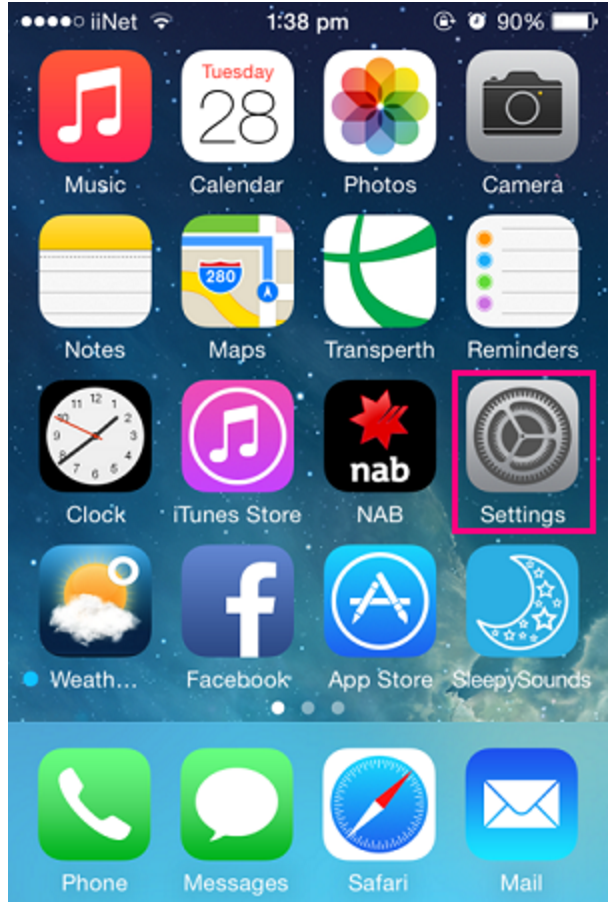
Disable a feature called Wi-Fi Assist which is enabled in the default settings of iOS 9.  Our iDevices can chew through ENORMOUS amounts, through updates and syncing. Go through the following checks to ensure your iDevice is NOT automatically chewing through precious data. The first step is to find the SETTINGS on your device.

Screen Shot 2016-02-12 at 7.17.00 AM

CONTROL UPDATES

TURN OFF i-CLOUD UPDATES

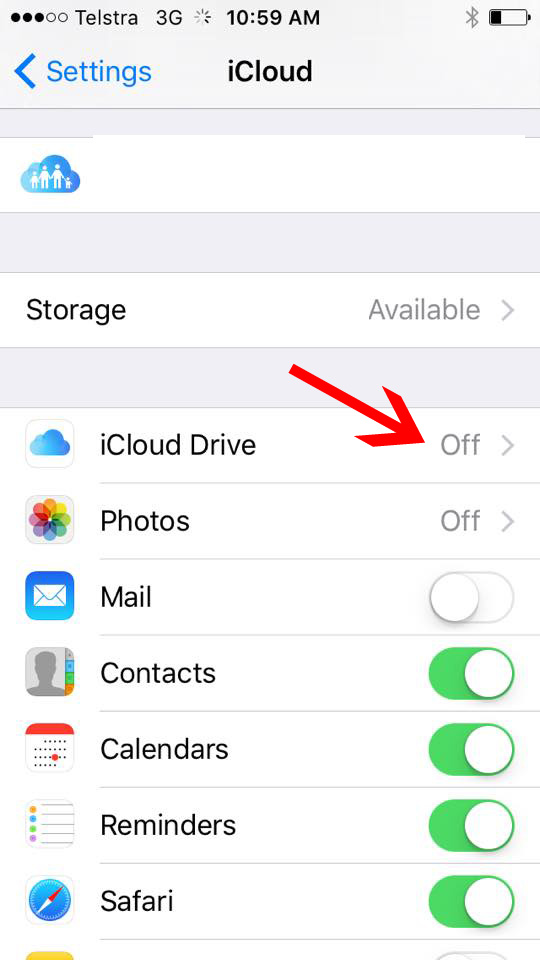
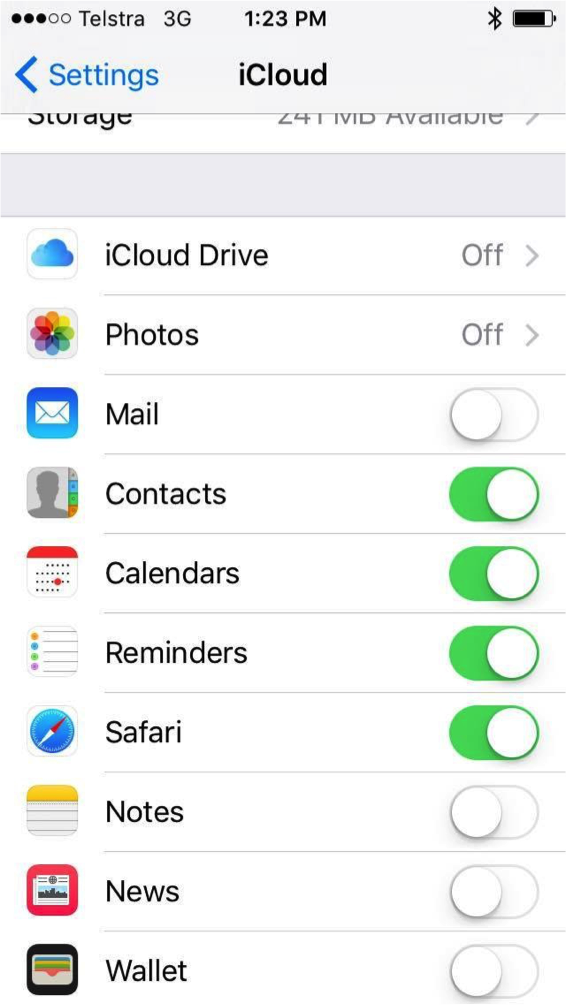
The constant syncing of i-cloud on iDevices, especially if you have several devices, can really chew through your data. You can always turn them back on if needed, but make sure you aren’t in ‘automatic update’ mode:

  • Go into Settings>iCloud
  • Uncheck ‘icloud drive

This is a good spot to uncheck any other ‘auto-updates’ you might not need synced.

icloud

APP UPDATES AND WI-FI ASSIST

Check that apps that aren’t needed all the time are not updating and turn off wi-fi assist. Wi-Fi assist automatically defaults to using your mobile data when Wi-Fi signal is poor. This means your mobile data could be used without you realising, causing your mobile service to exceed your monthly quota and accrue excess data fees.

  • Go into Settings>Mobile
  • Go though your apps and  UNCHECK those you don’t need constantly accessing data.
  • UNCHECK the Wi-Fi assist option at the bottom

NB: Wi-Fi assist is a feature that is enabled by default in iOS 9. If your i-Device is running an earlier version of iOS, your device will not have this feature.
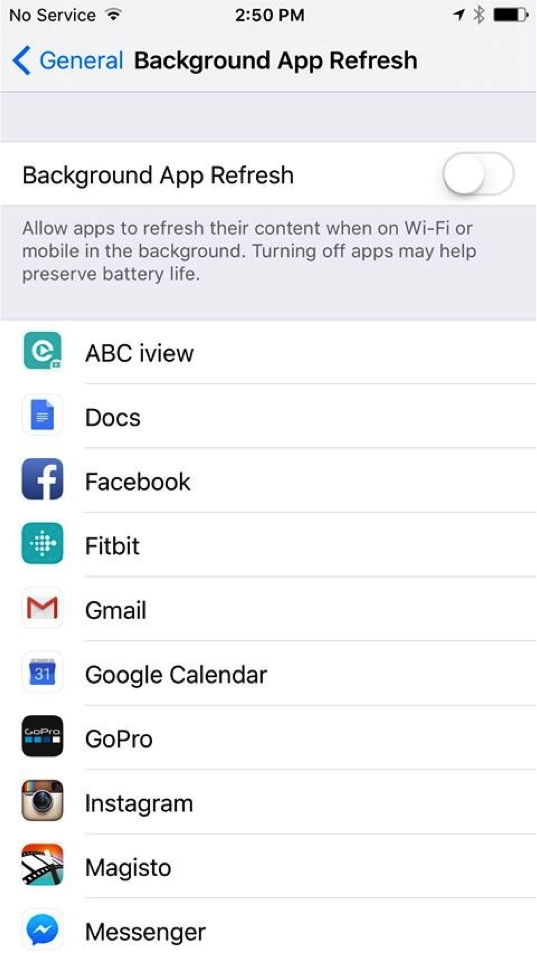
  • wifiassist

APPS REFRESH

  • Go into Settings>General>background app refresh
  • turn off (this will also save battery life)
  • BAR

AUTOMATIC UPDATES

WARNING: Your i-Device will automatically download iOS updates (when a new one is available) while it is charging, connected to the internet (thru WiFi) and there’s sufficient free space on the device. It will then prompt you to install, turning off updates will NOT prevent the auto download of iOS updates. Turning your device to airplane mode whilst charging OR having your device ONLY on cellular may prevent this.  

  • Go into Settings>App and iTunes Store>Update
  • Scroll down this page until you see the AUTOMATIC DOWNLOADS heading. All new content that you buy after you turn on Automatic Downloads automatically downloads to all of your devices. When you turn on Automatic Downloads, your device associates with your Apple ID.If you use Family Sharing and turn on Automatic Downloads, content bought by other members of your family won’t automatically download to your devices. Only content that you purchase with your Apple ID downloads automatically.Here, you’ll see four options. Turn off Updates and other automatic downloads such as Music, Apps and Books.

Music – When turned on, any purchased iTunes music will download automatically.

Apps – When turned on, any purchased apps will download automatically.

Books – When turned on, any purchased Books will download automatically.

Updates – When turned on, updates for any apps on your device will download as soon as they become available.

  • turn off Use Mobile Data for automatic downloads

See expert tip at the bottom of this article to adjust settings in your router (at OWN risk), this is the only way to prevent automatic iOS updates.
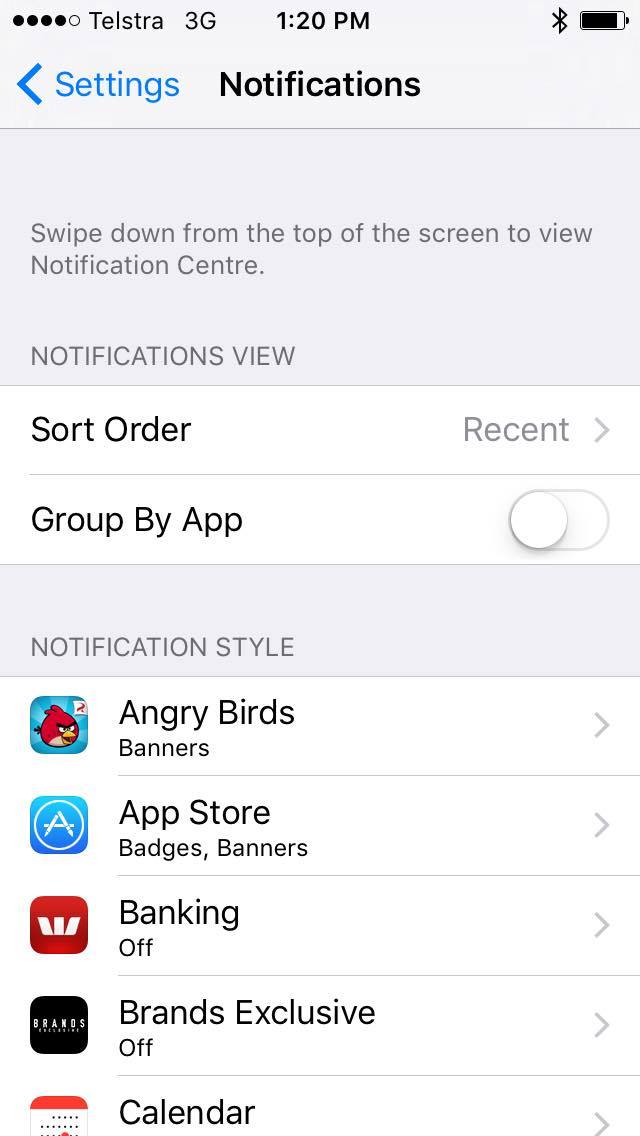
Turn off Automatic Downloads in App & Itunes

PUSH NOTIFICATIONS

  • Go into Settings>Notifications
  • If your iDevice has an Internet connection and you turn on Push Notifications, your content automatically downloads to your device. On devices that don’t support Push Notifications, your content automatically appears in your iTunes download queue. You can manually download the content in iTunes.
  • Turn off any apps that you don’t require push notifications for.

12669776_10154770136082316_598626597_o

All of the above tips will often need to be re-applied after completing an update.

An easy and easy to forget tip is also to shut down all your apps and browser windows when you have finished with them.

  • Double click HOME button
  • Swipe apps (and browser windows) closed.

This is a small selection of the many data-saving tips you can employ – find more here Data Saving Tips

Expert Tip: Your iDevices will automatically download iOS (when new one is available) while it is charging, connected to the internet (thru WiFi) and there’s sufficient free space on the device. To disable automatic download, you will have to put a block on your wireless router to prevent your Apple iOS devices from contacting Apple update servers. Add mesu.apple.com to your router in access control.

Tips if you have multiple iDevices: You can use a computer with iTunes to download IOS Updates once, and then manually install the update onto multiple devices. Instructions for doing this are available by clicking here.

Another option, if you have a Mac computer, you can install the macOS Server app from the mac App Store, which costs $19.99. This has a feature called “Caching” which, when turned on, will intercept any downloads from the mac and iDevice app stores, and keep a copy. Next time a device requests the same file, it will download it from the mac instead of from the internet, saving your data. There is no need to tell your iDevices to fetch the updates from your mac, it just happens automatically  This works with every device on your network. I have used this in a school with lots of iPads, and it was saving 100+GB per week at one point. Some more info is available here.

* Please note, while all care has been taken in compiling BIRRR documents, we recommend that you check with your service provider regarding your own connection issues and best plans available.  Information compiled for BIRRR by Julie Stott, Amanda Salisbury, Kye Rosendale, John Kitchener & Kristy Sparrow.  BIRRR updates articles as time permits and when new information is available.

Kain’s nbn™ non-standard Fixed Wireless Install

Kain’s Story:nbn™ Fixed Wireless non-standard install

tower
My experience started about 8 months ago. After numerous articles in the paper, ads on TV and radio, the letterbox pamphlets and all the typical fanfare that happens with a new technology, the NBN was finally available in the area my family’s property is in! It would be a huge improvement on the slow ABG Satellite and expensive yet unreliable mobile broadband that we had at the time.

After comparing plans, we chose a provider and signed up. Surely if we could get mobile coverage we could get fixed wireless……. But it was not going to be that simple. When the installer came out to do a signal test, the result was not good, -106dBm. The cutoff was -96dBm. No install for us.  After calls to the RSP, NBN etc,the verdict was we’d have to wait for the satellite service. But, being as stubborn as I am, I started doing a bit of research to work out why we could not get it.  After researching the tower locations on the mynbn.info website and checking on Google maps, I worked out the signal was blocked by a granite ridge behind the house. What about a mast on the hill I thought? More calls to NBN and the result was bad luck, we were listed as unable to get NBN. They wouldn’t send a tech out for another signal test, even though I could literally see the NBN tower from the top of the hill. Very frustrating!

Kain
The tower, clearly visible from the top of the hill

Fast forward a few months, I was put in touch with the team from BIRRR who not only had some great resources and information available on the page, but also worked hard to get us re-listed as Service class 5 (NBN Fixed wireless available, no NTD Installed) so that we could book another install!

Not wanting another fail, I studied as much as I could on fixed wireless technology, installation requirements etc. These can be found on the BIRRR pages, NBN Website, Whirlpool forums, ACMA Website etc. But to summarise; here are a few requirements:

  • You MUST be located within 14KMs of an active NBN Fixed wireless tower. Line of sight is recommended, as the frequency used is affected by terrain. Solid terrain such as hills etc will degrade the signal heavily, as will thick bush land. A few gums etc. will affect it but not as badly. It is the water in the foliage which interferes.
  • For a pass, the signal has to be at least -96dBm. The lower the number, the better the signal eg. -70dBm is better than -80dBm. Since this time, the cutoff point has been increased to -99dBm.
  • The install has 2 main components, the ODU (Out Door Unit, a panel antenna and modem) and the NTD (Network Termination Device). The maximum cable run between the 2 units cannot be more than 80 metres. This is the cable run, not the distance “as the crow flies”. The ODU has to be mounted where it gets a strong signal from the tower. The NTD must be mounted within 1.5 metres of a 240v power supply in a weatherproof enclosure that does not get too hot or cold.
  • The cable joining the two components must be run through white telecommunications conduit with no sharp bends at a minimum depth of 30cms underground from the building housing the NTD to the mast/building where the ODU is located. It needs to have a string line run through from one end to the other to feed the cable through, and this is much easier to do as you are joining the conduit as opposed to trying to feed it through the whole length.
  • If a mast or tower needs to be erected, it is the responsibility of the owner to have it in place and meeting any local legal requirements. It must be sturdy. A 10 metre length of gal pipe tied to a star-picket is a no-go… I would recommend buying a proper radio tower if needed. These can be sourced from Hills, Nally towers etc.
  • The installer is not responsible for ensuring access to the mounting location, the property owner is. This means if it is to be mounted on a 14 metre mast, the owner has to provide a cherry picker on the day of the install. No installer will climb a 14 metre tower, especially a home-made one.
  • NBN responsibility stops at the NTD. If you need to get the internet from that location to another location or to multiple devices, this has to be arranged by the owner at their own expense.

There may be things I have missed… I recommend doing your research and double-check everything. There are a lot of resources available on the BIRRR page including a guide to fixed wireless installs, both standard and non-standard.

Now that I had all the info required, I could get everything ready for the install.

STEP 1: My first step was to put a building on a spot on the property where I could get a strong signal. After a bit of hunting around, I bought a cheap caravan for the purpose. My reasoning for this was that a caravan can be parked anywhere on your property without council approval providing nobody is living in it, whereas building a shed would need a development application approved. Check your local council regulations on this, as it may vary. I parked it as close to the top of the ridge as I could.

kain2

STEP 2: The second step was to put up a mast with line of sight to the tower. Since I had the van close to the ridge, the mast only needed to be above the height of any stray kangaroos etc. So I went with a 3 metre length of 1” galvanised pipe cemented 60cm into the ground, remembering the conduit end.

kain3

STEP 3:  Digging the trench proved to be difficult, as the 20 metres closest to the mast was full of bush rock. There must have been about 10 ton of rock that I pulled out with a 4×4 bit by bit. After the trench was done, I ran the conduit. This was proper NBN Conduit available at a local electrical wholesaler for about $1/metre in 4.5 metre lengths. To make it even simpler for the installer, I ran the cable as I was going. This meant purchasing it myself, but it was a time-saver and on the day of the install the tech was grateful it was done. The cable has to be outdoor gel-filled Cat5e ethernet cable. I purchased this from an electrical supply store in Sydney at 88c/metre.

Conduit

STEP 4:  Due to the location, running a 240v power supply from the house to the van was not practical, so I installed a 250w solar panel and 330Ah battery bank with a sine-wave inverter for power. Being over the 90 metre limit for Ethernet to the house, I decided that a wireless bridge was the logical step. When setting these up, you have to be careful not to exceed the maximum power limit of 4 watts EIRP for broadcasting, or the ACMA can hit you with massive fines. If you are going this route, I would recommend getting it installed by a professional if you are not experienced with wireless networking.

kain4

Now that all the prep work had been done, I booked an install through SkyMesh (who I have to say are brilliant to deal with, it’s a good change waiting on the line for just a few minutes and talking to an Aussie) and on the 30th of December 2015, the tech showed up on time, did a quick signal test and the result was great… -60dBm! Well within the limits.

Within an hour it was all installed and after a bit of a wait, we were activated!

After all that work, there was a happy ending!

kain5 kain6

These speeds are about the average we receive now, and so far the setup has proved to be fairly reliable.

I would like to thank Kristy Sparrow and the team at BIRRR, Skymesh and NBN. For making this possible and turning an extremely frustrating situation around for a positive outcome.

Disclaimer: This document is meant as an informative document based on my own research and experience. Any views, opinions, information etc. provided is not necessarily the same as that provided by NBN Co, BIRRR, SkyMesh or any other organisation referred to here.  Prepared for BIRRR by Kain Fitzgerald.


Telstra Air Explained

FREE WiFi with TELSTRA AIR

Telstra Air is Free Wi-Fi at thousands of Telstra Air hotspots across Australia for eligible Telstra mobile (available 15 December 2015 – 30 June 2016 ONLY) and broadband customers.  You can check your eligibility here: TELSTRA AIR

Screen Shot 2016-01-13 at 8.04.20 AM

There are two options for Telstra Air:

OPTION 1 Mobile Customers: For those using mobile phones, prepaid devices, sim only plans etc. You can access the internet via FREE Telstra Air Hotspots from 15 December 2015 to 30 June 2016. If you activate the offer, you’ll get access at no charge to available Telstra Air Wi-Fi hotspots in Australia for your personal use until the end of the offer period.

NB: BigPond Mobile Broadband, satellite mobile broadband and business customers are NOT eligible.

OPTION 2 Home Broadband Customers: If you have ADSL, Cable or NBN connection and have a compatible gateway you can become a member of Telstra Air.  This uses your home data allowance when you are away from home, it accesses the internet via Telstra Air hotspots.  You will need to become a Telstra Air member first.

To join Telstra Air – CLICK TO JOIN

To find a Telstra Air Hot Spot use this tool

The Telstra Air App is also a quick and easy way to connect, locate hotspots and more

I’m a bigpond mobile broadband customer for my home internet plan and a business customer for my mobiles, which makes me ineligible for Telstra Air.  However thanks to the generosity of fellow BIRRR members I have been offered Telstra Air passwords (for Option 2) to use when I am travelling.  You may also be able to find family or friends who have large home broadband accounts that are willing to share their data.

*Compiled by Kristy Sparrow for BIRRR 15/1/2016 Please note, while all care has been taken in compiling BIRRR documents, we recommend that you check with Telstra regarding  your plans and the use of Telstra Air.

Mobile Broadband Modems

A modem is a device that allows access to the internet.  Some of the modems listed below are also routers, meaning they supply a wifi connection for use with multiple devices.

Optus

 Optus 4G Home Wireless Broadband

500GB $75/mth 24 Month Contract or Month to Month ($216 modem up front charge)

Must have Optus 4G coverage. Signal and speed may be improved by adding an antenna to the modem. To check availability at your address click here

Optus 5G Home Internet

Unlimited Data $70/mth 24 Month Contract or Month to Month ($200 fee)

Must have Optus 5G coverage. Signal and speed may be improved by adding an antenna to the modem. To check availability at your address click here

Optus Portable PrePaid Devices

Screen Shot 2020-08-02 at 5.27.00 PM

Must have Optus coverage. Signal and speed may be improved by adding an antenna to the modem (check specifications to see which devices have antenna ports and for further details on available plans).

Telstra

Telstra 5G Wi-Fi Pro

Screen Shot 2020-08-02 at 5.49.07 PM

200GB $99.95/mth (includes modem) or $75/mth (no modem) 24 Month Contract

Must have Telstra 5G coverage. Signal and speed may be improved by adding an antenna to the modem. Telstra currently offers 5G in select areas and is progressively rolling it out to other areas. In non-5G coverage areas, you’ll automatically switch to 4G or 3G. Check coverage at telstra.com/coverage

NETGEAR 4G Nighthawk® M2

Screen Shot 2020-08-02 at 5.54.37 PM

200GB $91.00/mth (includes modem) or $75/mth (no modem) 24 Month Contract

Must have Telstra 4G coverage*. Signal and speed may be improved by adding an antenna to the modem.

NB: In BIRRR’s experience these modems do not perform well in 3G only areas

The Telstra Mobile Network offers 4GX in all capital CBDs and selected suburban and regional areas and is progressively rolling out to more places. In other coverage areas around Australia, you’ll automatically switch to our fastest available 4G or 3G. Check coverage at telstra.com/coverage

Telstra PrePaid Portable Devices

Screen Shot 2020-08-02 at 6.00.37 PM

Screen Shot 2020-08-02 at 6.03.17 PM

Wireless internet devices, which include a Pre-Paid SIM card (already inserted). For plan and device details click here

Vodafone

Vodafone Pocket WiFi® 3 4G

Screen Shot 2020-08-02 at 8.18.04 pm150GB $67.50/mth (includes modem) – 12 month contract

Must have Vodafone coverage (heck your coverage with the Coverage Checker). Modem and plan specifications are detailed here. Also available as a PrePaid device.


Huawei WiFi Cube 2 4G

Screen Shot 2020-08-02 at 8.39.34 pm


150GB $78/mth (includes modem) – 12 month contract

Must have Vodafone coverage (check your coverage with the Coverage Checker). Modem and plan specifications are detailed here.


NB Tec

NB Tec are a solutions specialist, their Longreach Modem solution is a  modem/antenna & booster in one that can connect to Telstra, Optus or Vodafone mobile networks.

Mobile Signal Enhancement

The above modems from carriers can be used in conjunction with a repeater and / or antenna to increase signal strength and speed.

Telstra Repeaters

Cel-Fi Repeaters for all Carriers

Equipment Suppliers, Installers & Specialists

*Please note, while all care has been taken in compiling BIRRR documents, we recommend that you check with your service provider, regarding your own connection issues and required equipment and plans.

Updated 01/08/2020


Alternate Voice Telephony

Alternate Voice Telephony

Everyone is familiar with landline and mobile phones. There are a number of alternative voice technologies that you may use over your internet connection. They can provide a reliable alternative or back-up voice service and they are inexpensive.

VoIP

VoIP can be an exhausting topic. In a nutshell it is a relatively cheap and reliable way of voice communication and can work well over satellite and other internet connections. You may use a standard analogue phone handset, or a dedicated VoIP cordless phone system etc. VoIP is available over the Interim Satellite Service and an improved VoIP service  is now available over the Long Term Satellite Service (Sky Muster). Click here to read more on VOIP over Sky Muster.

For more details regarding a VoIP service, talk with your RSP or arrange for a VoIP service with a VoIP only service provider.

Skype

You may use Skype for voice calls, with the Skype app installed on your smart phone or computer. You can call home and mobile numbers for a small cost. See http://www.skype.com/en/features/call-phones-and-mobiles/. You may also purchase a Skype cordless phone which LAN cable connects to your internet router. See http://dualphone.net/

*Please note, while all care has been taken in compiling BIRRR documents, we recommend that you check with your service provider, regarding your own connection issues.

Prepared  for BIRRR by John Kitchener 7/1/2016

Selecting The Correct Antenna and How To Point It

BIRRR Guide to Antenna & Equipment Suppliers & Installers

Passive Antennas are usually mounted on the roof (e.g. yagi antennas) and do not require licensing.

Active Antennas such as the Nextivity Cel-Fi Repeaters / Telstra Branded Smart Antennas (that require power) do require licensing.  If they are not licensed they are ILLEGAL boosters.

Illegal boosters carry a large fine as they can interfere with the mobile network.

” It is an offence under the Radiocommunications Act 1992 (the Act) to operate an unlicensed radiocommunications device, or possess this device for the purpose of operation. A person found guilty of this offence may be imprisoned for two years for each offence. A body corporate may receive a penalty of up to $270,000 (1,500 penalty units) per offence (sections 46 and 47 of the Act). Other penalties may apply, such as the interference offence provisions at Part 4.2 of the Act.” ( ACMA )

The key components of a passive antenna installation are:

  1. Selection of the correct antenna. The correct antenna is one that works for the bands/ frequencies that are broadcast by your service provider at your location. BIRRR recommend reading through our mobile network enhancement page and getting a desktop site survey done. The chosen antenna must have appropriate directional gain. Where there are several competing towers, an omni-directional antenna might be suitable. For some locations, a good internal antenna placed in an optimum location by a window, may be all that is required. See Telco Antennas – Antenna Selection Guide , it explains which antennas work best in various geographic locations.
  2. Antenna location ie how high, best location on roof etc. This can be a tedious task, but well worth the effort. It is known as the ‘antenna dance’. If you get signal outside, your mobile phone may be used to find the spot with strongest signal. Ensure that your phone supports the same bands as your modem and the service that you are ‘chasing’. Follow the directions listed in this document. The signal level will display in a negative value in dBm. The lower the negative value the stronger the signal e.g.-81dBm is stronger (better) than -89dBm.
  3. A suitable mast. Your TV antenna or your satellite dish mast may be suitable, but then again they may be in a poor location for mobile data.
  4. Where to best point a directional antenna. Your desktop signal survey will have located the towers which service you. Use Google Earth or similar to determine the direction of these towers from your location. Point your antenna accurately by using local landmarks that indicate the direction of the required tower.
  5. A gas arrestor may assist in lightning protection of your equipment. Install a gas arrestor and grounding (as required). Seek professional advice for optimal installation of these devices. Contact your equipment provider.
  6. Once the installation is complete, re-check the signal level and fine tune the antenna direction by using your indoor modem, hotspot mobile phone or Cel-Fi repeater signal level screen. This will also check that your coaxial connections are sound.
  7. Coaxial connectors cause signal loss. Good quality connectors minimise this. Use N-type connectors where possible e.g the antenna to cable connector. See this guide for further information on Telco Antennas coaxial cable types and connectors.  Ensure that all external connections are waterproofed with self amalgamating butyl rubber tape.
  8. Ensure that the coaxial cable run from antenna to equipment is as short as possible and is the best lowest loss cable that you can afford. It is no good installing a great antenna, only to lose precious signal and potential performance by using poor quality, high loss coaxial cable. Locate the phone, modem or Cel-Fi device as close as possible to the antenna.
  9. Choose the correct pigtail to interface your coaxial cable to your modem, hotspot, phone or Cel-Fi repeater. The pigtail is a short flexible piece of coaxial cable which adapts to your device.

A diagram of a typical external antenna installation, which identifies the key components, follows. If a MIMO installation is required install two cable runs etc. More on MIMO below:

antennas


Signal levels and the mysterious dBm

Your phone or modem can be used to display signal levels in dBm. It is important to understand the differences between a 3G signal level and a 4G signal level and how this translates to quality of service.

GSM & 3G networks (RSSI)

The 3G signal level is identified by a measure called RSSI (Received Signal Strength Indication) and is measured in dBm. RSSI is a measure of the available signal plus the noise in band. A level of -50dBm is a perfect signal and at -110dBm (usually earlier) you’ll lose the 3G connection.

  • -50dBm to -75 dBm – High Signal (good voice and data)
  • -76dBm to -90 dBm – Medium Signal (good voice and data)
  • -91dBm to -100 dBm – Poor Signal (good voice data, marginal data with drop-outs)
  • -101dBm to -109 dBm – Very poor Signal ( voice may be OK, no data)
  • -110dBm to -113 dBm – No signal

4G/LTE (RSRP)

LTE signal strength is measured in RSRP (Reference Signal Received Power). The 4G RSRP signal level measure is as a ‘rule of thumb’ around -20dBm lower than the 3G RSSI measure, such that 100dBm (RSSI) would equate to around -120dbm (RSRP). RSRP is a more accurate measure of signal strength than RSSI, as it excludes noise and interference on the network. It measures just the usable portion of the signal. Although the 4G RSRP signals appear lower, it does not mean your signal level is worse.

  • -50dBm to -90dBm strong signal (stronger signals are possible), fast data
  • -91dBm to -105dBm good signal, fast data
  • -106dBm to -112dBm fair signal, useful and reliable data speeds may be attained
  • -113dBm to -125dBm reliable data possible, performance may be slower, increased latency
  • -126dBm to -136dBm performance will drop dramatically
  • -136dBm to -140dBm – Disconnection

Read more here: Making Sense of Signal Strength

What is 4G MIMO and why might I need it?

MIMO is a very clever RF technique that effectively doubles the bandwidth of a radiated 4G carrier. It is not available for 3G in Australia. A MIMO antenna installation may double the download speed at your location. Effectively it is something for nothing, (well almost nothing).

Note: And example of the use of MIMO is WIFI and it is used to increase speed of WIFI transmission. Those two (or three or four or more) antennas on your wireless router use MIMO.

See Telco Antennas for further details on MIMO.

Still need more info ? Check out Telco Antennas Frequently Asked Questions

NB: Telstra will be switching off 3G in 2024. With this in mind BIRRR does not recommend spending large amounts of money on boosting 3G service. 3G is being replaced with 4G (if spending any money on antennas or repeating equipment please ensure these are 4G compatible) and also be aware that boosting 3G service may not deliver faster speeds or reliability.

*Please note, while all care has been taken in compiling BIRRR documents, we recommend that you check with your service provider, local government and local installer regarding your own connection issues and infrastructure needed. 

Prepared by BIRRR in conjunction with John Kitchener and Telco Antennas

Updated 1st August 2020

SKY MUSTER PLANS BETTER FOR THE BUSH, BUT FOR HOW LONG?

Bush broadband to get a light shower, but no real end to #DataDrought predicted.

Screen Shot 2015-12-14 at 12.37.23 PM
Image from nbn co

After a long wait, Australia’s bush broadband users can finally get a look at nuts-and-bolts information for the new Sky Muster satellite with the release by nbn co of the Satellite Fair Use Policy… and it confirms their expectations.

Whilst they were hoping for a widespread soaking of data, the announcement of plans by nbn co for the Sky Muster satellite has provided ‘a light shower’ rather than long-term resolution of predicted data shortfalls.

“With years of dealing with almost non-existent speeds and very low data limits, rural regional and remote Australians have been looking hopefully to Sky Muster as ‘The Answer’ to their internet woes,” said BIRRR chief admin, Kristy Sparrow.

The maximum plan (issued by nbn co to retail suppliers) will be 75Gb Peak data usage, peak & off peak data limits will be set by providers. The Sky Muster Satellite is expected to be available for use by customers in four months time (April 2016).

There are 200 ‘trial sites’ currently being installed for Sky Muster by nbn co.

“While this (announcement) is better that we currently have, it by no means covers what data needs could be in a year, two years time, let alone another decade,” said Ms Sparrow.

The maximum nbn co deal of 150Gb (total) will see users speed limited if they breach the plan limit over a 4 week rolling period. The nbn co Fair Use Policy has severe penalties (for the service provider) if a user goes over the 150Gb in any 4 weeks (not necessarily their billing period). This will impact plan pricing and tiers as no provider will want plan limits breached. nbn co considers that 75Gb or more of data usage during Peak hours in any four week period constitutes a breach of its Fair Use Policy AND 150Gb or more of Data Usage in any four week period (Peak or Off Peak) also breaches the Fair Use Policy.

“As we take on feedback from people across Australia at the BIRRR Facebook group, members are very concerned that the new limits – while an improvement on current restrictive plans – will not address decent long-term service across Australia, as business becomes more and more internet and cloud based.“

Everything is app or internet dependant these days – from mapping and management of properties, to tracing cattle movements and payment of bills and accounting needs. That’s not even taking into innovative farming technology, social, health or education requirements”.

The BIRRR team were also disappointed to see off peak times announced as 1am – 7am and hope that nbn co and providers continue to investigate innovative ways to use off peak data allowances.

“The majority of members feel that these times are virtually unusable and as such the data will not be able to be accessed,” Ms Sparrow said.

BIRRR were however thrilled to see details of a second port for distance education users released, details are still to be confirmed however the port is expected to provide distance education students with a 50GB per student data allowance (to a maximum of 150GB per port), as well as expected priority of access to Skymuster.  This is fantastic news for primary and secondary students and we hope tertiary students can be included in the near future.

“All in all, whilst there has been some improvements, we are still going to have inequitable service and costs when compared to metropolitan areas,” Ms Sparrow said.

“Our main concern at BIRRR is that data usage is doubling at a rapid rate and plans are not keeping up.”

Speeds are expected to be better than current connections, with 25/5Mbps touted by nbn co. Current BIRRR survey data shows, bush broadband users endure speeds below 4/2Mbps (and often less than 2Mbps).

BIRRR predicts customers will flock to secure access to the new satellite as soon as providers have plan offers available.  Skymesh LTSS plans are available here 

As information and plans become available, the BIRRR team will post it to their website: www.birrraus.com.au as well as the Facebook page.

BIRRR urge all regional Australian’s to ensure they complete the regional internet access survey to ensure our voices are heard. Please access the survey here


Mobile Blackspot Program Information

Mobile Black Spot Program Tower Details

The Australian Government is improving mobile phone coverage and competition in regional and remote Australia through the Mobile Black Spot Programme (MBSP). As of 18/3/19 there have been 4 rounds of Federal Government MBSP funding. You can read more about the types of base stations that are used in the MBSP program, including small cells here.

How MBSP were funded (all 4 rounds)?

  • Over $220 million has been committed by the Federal Government through the Mobile Black Spot Program to improve mobile coverage across Australia.
  • 1047 locations around Australia will receive improved coverage under the four funding rounds of the Program (Round 1: 499, Round 2: 266, Round 3: 102, Round 4: 180).
  • Thanks to working cooperatively with state and local governments as well as the three major carriers (Telstra, Optus & Vodafone) and community and private sector groups locally, the total amount to be invested under the program is $760 million.
  • As of 15 March 2019, 682 sites have been switched on.
  • Base stations under the first three rounds are expected to be operational by 30 June 2019. Round 4 base stations are expected to roll out shortly, with the first new base stations being activated by the second half of the year.
  • Rollout sequence is being determined by the carriers, based on various factors, such as obtaining local government planning approval and landowner agreement where necessary, and/or the ability to access existing infrastructure, power and backhaul.

Every $1 of Commonwealth money has leveraged nearly $3 of contributions from other sources. The program will boost competition in mobile communications.

More information is available at: www.communications.gov.au/mbsp

Round 1

The first round 1 base stations commenced rolling out in December 2015. The full rollout of all 499 mobile base stations funded under Round 1 is expected to occur over three years. It is estimated that base stations funded through Round 1 of the Programme will deliver handheld or external antenna coverage to all or part of approximately 3,000 of the 6,221 locations on the database. This is because many of these base stations will serve multiple nominated black spot locations. Those black spot locations which have not received coverage under Round 1 will continue to form part of the database, and this database will again be used in the process of determining locations to receive funding under Round 2 of the Mobile Black Spot Programme.

The rules of the program were designed to give the mobile network operators incentives to secure co-contributions from state governments and other sources, with more points going to base stations supported by a co-contribution. The rules also gave each state government an incentive to put in money – because that in turn would maximise the share of the Commonwealth money going to base stations in that state. The result was significant funding from NSW ($24 million), Victoria ($21 million), Queensland ($10 million) and Western Australia ($32 million).

The points scheme also encouraged community contributions – with some remarkable outcomes. Jemalong Irrigation Ltd, which operates west of Forbes, NSW, put in a total of $220,000 and will secure two new base stations as a result. Similarly, in the Boyne Valley region of Queensland, Calliope & District Enterprises Ltd offered a co-contribution of $50,000 while the Calliope Rodeo Association contributed $80,000, which led to a successful proposal for a base station in Ubobo.

Current Mobile Blackspots that have been funded under Round 1
FundedBlackSpots

A PDF of the actual mobile blackspots in round 1 is here

A map of locations which will receive new or upgraded coverage under Round 1 of the Programme can also be viewed on the National Map or downloaded as an Excel file. In addition, as part of Telstra’s proposal, it will deploy up to 200 4G small cell sites in towns around Australia where suitable infrastructure is available, with the locations to be mutually agreed between Telstra and the Government. More details hereDetails of the Round 1 Funded Black Spots

Telstra also rolled out further small cell locations to complement the mobile black spot program. The small cell sites were funded by Telstra itself, and are being installed in addition to the 429 base stations built or upgraded by the telco under the AU$94.8 million in funding received from the federal government as part of round one of the mobile blackspot program. More details here

Round 2

Round 2 will see a total of $213 million (GST incl.) being invested in new mobile base station infrastructure. The Australian Government funding for Round 2 has been supplemented by Telstra ($63.7 million) Optus ($36.4 million) and Vodafone ($1.6 million). In addition, six state governments have co-contributed towards Round 2: New South Wales ($8.3 million), Queensland ($13.7 million), South Australia ($1.5 million), Tasmania ($0.35 million), Victoria ($7.9 million) and Western Australia ($21.8 million). An additional $475,000 has been provided by local governments, businesses and community organisations.

The first round 2 base stations are expected to commence rolling out in 2017.

Current Mobile Blackspots that have been funded under Round 2
(yellow square is a small cell and red square is a macrocell)

A PDF of the actual mobile blackspots in round 2 is here

Round 3

The Australian Government has committed an additional $60 million to a third round of funding. As part of this commitment, the Australian Government has announced a number of priority locations which may receive funding for a mobile base station under round 3.

Mobile coverage issues for 19 of the priority locations are already being addressed through previous rounds of the program, an alternative Government program, or through the mobile carriers own commercial investments.

A further $82.8 million in new investment will address the remaining 106 priority locations. The outcomes include:

  • $45.6 million in Commonwealth funding for 102 mobile base stations (12 Optus, 89 Telstra and one Vodafone), which includes the deployment of Telstra 4G small cells to address specific coverage issues at selected black spot locations.
  • All macrocell base stations will be provisioned with a minimum of 12 hours of back-up power
  • Optus and Telstra have recognised the coverage issues identified at four priority locations and advised that they will address these issues commercially.
  • Funding for the Priority Locations round has been supplemented by Telstra ($34.6 million), Optus ($2.3 million) and Vodafone ($0.3 million).

Round 3 is different to Rounds 1 and 2 as the government nominates which locations it feels should receive funding for a mobile blackspot and it will be up to the Telcos to bid for those locations.

The Australian Government has allocated $60 million (GST exclusive) to the Mobile Black Spot Program to target 125 specific priority locations. The outcome for each priority location is listed in this PDF:

Database of reported mobile black spot locations

Under Round 1 of the Programme, a database of 6,221 locations around Australia was developed, being locations nominated by Australians as needing improved mobile coverage. This database was the starting point for the competitive selection process under which the mobile network operators were asked to nominate where they would build new or upgraded base stations.

12242220_10153802145913417_312432833_n

Round 4

On 10 June 2018, the Federal Government announced it had allocated $25 million of Mobile Black Spot Program funding towards a fourth round, to deliver improved mobile coverage to more regional and remote communities across Australia. Round 4 funding specifically targeted coverage issues at public interest premises, such as tourist sites and emergency services facilities and locations were announced during the week of 18/3/19.

  • Round 4 of the Mobile Black Spot Program is delivering 180 new mobile base stations (49 Optus and 131 Telstra).
  • These base stations will address coverage issues in regional and remote areas including 73 base stations that specifically target coverage issues at Public Interest Premises, such as tourist centres and emergency services facilities.
  • Overall Round 4 will deliver a total investment of more than $83 million (GST inclusive) in new mobile infrastructure including funding from the Commonwealth, mobile carries and State Governments (Queensland, South Australia, Victorian and Western Australia).
  • The Round 4 rollout is expected to commence shortly with the first new base stations set to be activated by the second half of the year.
  • The Liberal and National Government is working with mobile network operators to encourage them to continue to invest in regional areas.

The list of successful Round 4 Locations can be viewed here:

The BIRRR Map of Round 4 Locations is featured below:

Screen Shot 2019-03-22 at 1.26.02 PM

Rounds 5 and 6

On 20 March 2019, the Minister for Regional Services, Senator the Hon Bridget McKenzie, announced that an additional $160 million had been allocated for Rounds 5 and 6 of the Program. Round 5 of the Program allocates $80 million in funding and the Government expects to soon release Program Guidelines for the round.


Prepared by Julie Stott & Kristy Sparrow for BIRRR, Source:  Australian Financial Review Source: Department of Communications and Arts

*Please note, while all care has been taken in compiling BIRRR documents, we recommend that you check with your service provider regarding your own connection issues and best plans available.

Cloud Computing : Dropbox , iCloud, OneDrive, Google Drive

Cloud computing has gone from a ‘buzz word’ a few years ago, to an integrated part of both Apple and Microsoft operating systems. We have Dropbox, Onedrive (Microsoft), iCloud (Apple), Google Drive etc.

THE GOOD

  1. You have a backup.
  2. You can also access to your files from anywhere that has an internet connection, across multiple devices.
  3. You can even share files with others.

An example of using DropBox:

‘I went to a party and took a lot of photos and a few movies with my mobile phone. As soon as I returned home, my phone connected to the WiFi and uploaded the files to the ‘cloud’.  These files were then accessible from my PC, my Laptop and my Tablet which not only meant that they were backed up they also could be viewed on the larger PC screen.’

THE NOT-SO-GOOD
Multiple movements of files: Internet use is calculated by both uploads and downloads. In the above example the picture and movie files were counted as data when they were transferred UP to the cloud, and then were counted AGAIN to DOWNLOAD to my PC. Then they were counted yet AGAIN to download to my laptop. By itself, it may not be a big thing, but it does add up.

What to do?

  1. Try to identify if you are running any cloud applications
  2. be aware that newer operating systems (by default) may automatically use cloud apps eg: iCloud and Onedrive.
  3. Consider turning them off completely – I have stopped using Dropbox and removed the apps from my mobile devices. Not only that the new install of windows 10 can automatically connect to Onedrive – event though no files were yet shared to it yet. And the new version of Microsoft word wants to save to Onedrive by default.
  4. Choose (instead) to save to the local computer.

(Thanks to Cliff Tindall From Christmas Island Computer Services for the above information.)

DROPBOX

How to PAUSE and RESUME syncing from Dropbox

Dropbox allows you to pause and resume syncing through the Dropbox menu in your system tray or menu bar on your computer.

When syncing is active, Dropbox will try to be smart about the amount of bandwidth it uses. Dropbox will use any remaining bandwidth available to download changes and only 75% of available bandwidth to upload changes. You can also adjust your bandwidth usage through the Dropbox desktop application’s preferences.

If you’d like to stop Dropbox entirely, you can do so through an option in your Dropbox menu.

Screen Shot 2015-11-08 at 7.36.51 AM Screen Shot 2015-11-08 at 7.36.41 AM

(The above information is taken from Dropbox)

How to DISABLE AUTOMATIC PHOTO UPLOADS in Dropbox on iPhone / iPad:

Step 1: Open Dropbox

Step 2: Tap the Settings gear icon (bottom right)

Disable-Automatic-Photo-Upload-in-Dropbox-iPhone

Step 3: Now, tap on the “Camera Upload” option

Step 4: Turn the switch to OFF

Turn-Off-Automatic-Photo-Upload-in-Dropbox-on-iPhone

That’s it. Dropbox will now stop automatic syncing of photos from your camera album.

Thanks to iGeeks Blog for the screenshots and tips.

iCLOUD:

Turn iCloud features on or off:

Depending on which device’s settings you want to change, do one or more of the following:

On your iOS DEVICE: 

Go to Settings iCloud, then tap to turn on or off iCloud features.

idevice cloud off

On your MAC

Choose Apple menu > System Preferences, click iCloud, then select or deselect each feature.

idevice cloud drive off.jpg

NB Some features aren’t available or are listed differently in earlier OS X versions.

On your WINDOWS computer: 

Open iCloud for Windows, then select or deselect each feature.

To make your changes take effect, click Apply.

S0012_WiniCloudPrefs

  • Some features aren’t available on your Windows computer, or are listed differently, depending on whether your computer has Microsoft Outlook 2007 or later installed.

    Outlook installed: You use iCloud Mail, Contacts, Calendars, and Tasks in Outlook. Note that iCloud reminders are called tasks in Outlook. If you turn off Mail, Contacts, Calendars, and Tasks, the iCloud information remains available in Microsoft Outlook, but it isn’t kept in sync with iCloud.

    Outlook not installedYou can use iCloud Mail, Contacts, Calendars, and Reminders in your web browser on iCloud.com.

TO TURN iCLOUD OFF COMPLETELY

Depending on whether you want to stop using iCloud on all or only some devices, do one or more of the following:

On your iOS deviceGo to Settings > iCloud, then at the bottom of the screen, tap Sign Out (Delete Account in iOS 7 and earlier).

Note:    If you sign out of iCloud (or delete your iCloud account), iCloud no longer backs up your iOS data. You can still back up your device in iTunes. For more information, open iTunes, then choose iTunes > Help.

On your MacChoose Apple menu > System Preferences, click iCloud, then click Sign Out.

On your Windows computerOpen iCloud for Windows, then click Sign out.

Note:    If you turned on automatic download of music, app, or book purchases (in iTunes preferences or in Settings on your iOS device), your iTunes purchases are still downloaded to your devices.
 
(Above information taken from APPLE SUPPORT)

OneDrive:

Windows 10 will put your documents, music, and photos automatically into its cloud service, if you don’t tell it not to.  Microsoft wants you to store your data in the company’s cloud-based storage service.   You have to change some settings to avoid this, as not only will it consume your data allowance it will also start to charge you when you use up your available space.

Turn off OneDrive for your documents, music, pictures and videos:

Right-click Documents in the Navigation pane (must be the Documents library, not any of the folders listed below it) and select Properties.

In the resulting dialog box, select the local location (probably C:\Users\yourname, where yourname is your login name) and click Set save location button.

1106-change-default-100622079-largeWhen you close the dialog box, your local Documents folder will be your default Documents folder. While both folders will be part of the library, new files will default to being saved locally.

Repeat and change the library settings for your Music, Pictures, and Videos libraries.

If you already have documents, music, pictures & videos stored in onedrive follow the steps here to store them locally on your computer rather than in a ‘cloud’ based program.

Information obtained from PC World 

Google Drive:

Google Drive for Mac/PC is the sync client. When you install Google Drive for Mac/PC, it creates a folder on your computer named Google Drive. Anything you put in this folder is synchronized with Google Drive on the web, and also becomes available on all your Google Drive devices. Google Drive provides bi-directional sync, so changes you make online are reflected on all your devices, and vice-versa. You can use Google Drive via your browser where it won’t automatically sync your files.

Turn off Google Drive Syncing

If you DO HAVE the Google Drive app downloaded to your computer or device, and you wish to keep your documents and photos from automatically syncing to the Drive folder on your computer, you can turn off syncing.

  1. On your desktop, click the Google Drive icon google drive desktop icon.
    • On a Mac, the icon is usually found in the menu bar at the top right of your desktop screen.
    • On a PC, the icon is usually found in the taskbar in the bottom right of your desktop screen.
  2. In the top right, click the overflow menu .
  3. Select Preferences.
  4. Uncheck the box next to “Only sync some folders to this computer.”
  5. Click Apply changes.

Change how much bandwidth Google Drive uses

You can increase or decrease the bandwidth used by Drive on your Mac or PC while syncing your files. Decreasing this bandwidth can allow more bandwidth for other programs on your computer.

  1. Click the Google Drive icon google drive desktop icon.
    • On a Mac, the icon is usually found in the menu bar at the top right of your desktop screen.
    • On a PC, the icon is usually found in the taskbar in the bottom right of your desktop screen.
  2. Click the overflow icon in the top right .
  3. Select Preferences.
  4. Go to the Advanced tab.
  5. To choose a different rate, click the radio button next to Limit to and use the up and down arrows to change the rate. The numbers are measured in kilobytes per second.
    • To use the full bandwidth for Drive, click the radio button next to Don’t limit.
  6. Click Apply.

Note: Changing the rate for downloads or uploads to a higher rate than your Internet connection allows may significantly slow other programs that you’re running using the Internet.

(Information Obtained from Google Support)

All efforts are taken to ensure BIRRR documents are correct at time of publishing, please contact your device manufacturer or cloud provider for further information.

nbn Fixed Wireless – Standard Installations

WHAT IS FIXED WIRELESS?

nbn FW (Fixed Wireless) is a fixed wireless service – it is delivered by radio communications, via antennas that transmit a signal direct to a small outdoor antenna attached to the premises.  It is a different technology to mobile broadband / wireless internet.

Screen Shot 2015-11-12 at 9.26.19 PM

Fixed wireless (FW) does not provide mobile phone service, and can not be moved (hence the term ‘fixed’).

The Regional Tech Hub have the latest information here.

ARE YOU ELIGIBILE?

Check your address for FW eligibility here:  nbn : Check your Address

GETTING FW ORGANISED

If you are able to obtain an nbn FW service at your address (if you are in the fixed wireless coverage area) you will need to contact a RSP (Retail Service Provider) also known as ISP (Internet Service Provider) to arrange for the equipment to be installed.  (nbn is an internet wholesaler and does not provide internet services directly to the public.)

A technician (nbn contractor) will be booked by the RSP to install the equipment. In the case of faulty equipment or connection problems you will need to contact your provider (not nbn).

POSITIONING CONSIDERATIONS
The best place for your indoor Network Termination Device is one that is:

  • Near your existing phone or network cabling or devices that you will use the most
  • Within 1.5 metres of a dedicated 240V power point (a mandatory requirement)
  • In a cool, dry, ventilated area
  • Away from busy areas where it may be knocked and damaged
  • Where it will be easy for you to check the indicator lights if there is a problem

Customers who wish to make use of a VoIP service over the nbn connection will have additional considerations (i.e. be close to existing phone cabling). BIRRR recommends that you maintain your exisiting phone service and NOT switch to a VOiP Based service.

In order to obtain nbn fixed wireless service you must be able to receive and transmit minimum levels of wireless signal between your property and a base station. Currently a signal test reading of -99dBm is needed.    A signal of -99dBm or stronger will result in an install of nbn equipment. The lower the number the stronger the signal ie -76dBm is better than -99dBm and anything over -99dBm will be signal failure.

You may need a mast to get an nbn fixed wireless signal. This is still a ‘standard’ nbn installation, however the installer may need to come back with the right sized mast.

All FW equipment is the property of nbn and should not be moved or adjusted.

CONNECTING YOUR FW EQUIPMENT

The next step once the nbn Fixed Wireless equipment is installed will involve connecting your Internet access equipment.  The antenna on the outside of a home will be connected by a cable running through the wall to the Network Termination Device (NTD) which will be located within the home. If you require WiFi from your nbn FW connection you will need to purchase a wireless router. BIRRR recommends purchasing a ‘plug and play’ router from your provider.


In the event that the ‘standard installation’ procedure fails you can consider a ‘non-standard’ install. Please read the BIRRR Notes on nbn Fixed Wireless: NON-STANDARD INSTALLATIONS

*Please note, while all care has been taken in compiling BIRRR documents, we recommend that you check with nbn or your ISP regarding your own connection issues.  Thanks to nbn for assistance in compiling this document.  Information has been obtained from nbnSkymeshWhirlpool forums and BIRRR members


Cel-Fi Repeaters

Active antennas or repeaters boost the 3G/4G signal.  Repeaters such as these that require power to the unit (Telstra Smart Antennas & Nextivity Cel-Fi Repeaters) require licensing.  If they are not licensed they are ILLEGAL boosters.

Illegal boosters carry a large fine as they can interfere with the mobile network.

” It is an offence under the Radiocommunications Act 1992 (the Act) to operate an unlicensed radiocommunications device, or possess this device for the purpose of operation. A person found guilty of this offence may be imprisoned for two years for each offence. A body corporate may receive a penalty of up to $270,000 (1,500 penalty units) per offence (sections 46 and 47 of the Act). Other penalties may apply, such as the interference offence provisions at Part 4.2 of the Act.” ( ACMA )

NB: Cel-Fi Pro and GO Repeaters and Telstra Branded Smart Antennas/Cel-Fi Go are the same devices, with the Telstra supplied one being different in colour, with Telstra branding.

Powertec Telecommunications are the only approved importer of the Nextivity Cel-Fi (outside of Telstra’s branded Smart Antenna). There are many resellers however, check our suppliers page for further info. The below repeaters & the Telstra branded repeaters are the ONLY licensed and legal repeaters that can be legally used in Australia.

CEL-FI Pro

Cel-Fi pro is an indoor smart signal repeater. Available for the Telstra, Optus or Vodaphone networks.

Screen Shot 2020-08-02 at 3.26.12 PM
Cel Fi Pro available for the Telstra, Optus or Vodafone Networks.

To help with setting up a Cel-Fi Pro or Smart Antenna visit the Cel-Fi page here or see the notes below. To purchase a Cel-Fi Pro in Australia, help with installation and compatible antenna advice visit Powertec

CEL-FI Go Stationary

Cel-Fi Go Stationary is a smart signal repeater. Available for the Telstra, Optus or Vodaphone networks. This multi-band solution is ideal for use in commercial properties, government buildings, agricultural settings, small manufacturing operations, rural areas, businesses, and large homes. To help with setting up a Cel-Fi Go Stationary visit the Cel-Fi page here. To purchase a Cel-Fi Go Stationary in Australia, help with installation and compatible antenna advice visit Powertec

Screen Shot 2020-08-02 at 3.28.22 PM
Cel-Fi Go Stationary

BIRRR highly recommend using surge protectors with the Cel-Fi Pro and Go Stationary devices and a UPS unit to power the repeater during general mains power failures or when the generator is off. They’re designed to power a desktop for 15 minutes or so, but are large enough to power a CelFi repeater for much longer.

CEL-FI Go Mobile

Screen Shot 2020-08-02 at 3.37.43 PM
Cel-Fi Go for vehicles

The Cel-Fi GO/GO+ is a Smart Signal booster for addressing the challenge of poor cellular coverage on the road. Ideal for vehicles and boats, a suitable antenna is needed and these are recommended to be installed by a professional. To purchase a Cel-Fi Go in Australia, help with installation and compatible antenna advice visit Powertec

NB:  Extension devices are carrier specific, if you require coverage across multiple carriers then you will need multiple models. 

Screen Shot 2020-08-02 at 4.31.42 PMCel-Fi Pro Installation Tips

Details on using the Wave app are available from Powertec here

Installation tips below thanks to Marcus Dowling from Rising Connection

Screen Shot 2020-08-02 at 4.17.16 PM

You may like to have two very long power extension leads to help with this while you move the CU & NU around find the best locations.

  1. Before powering up the units, walk around your property and look for both the strongest and weakest signal on you mobile. This is important, with the Cel-Fi units, if the CU (Coverage Unit/Smaller box) picks up too much signal, it will automatically back its ability off, so find the areas where you get “BAD” signal (preferably none) as options as to where you will put the CU.
  2. (skip if not using an external antenna) Choose two locations where you are not getting good signal, if the NU (Network Unit/Bigger box) can pick up enough signal with its internal antennas, it will by default ignore the external antenna, the NU has several very decent size antennas in it, way better than any normal mobile phone has.
  3. (skip if using an external antenna) put the NU (Network Unit/Bigger box) where you can find your strongest signal as in #1, that could be outside, just make sure the unit is protected from the weather and elements, the NU has several very decent size antennas in it, way better than any normal mobile phone has. Look to see that you are getting as many bars as possible (with the CU switched off) on the NU. The better you get the signal onto the NU, the better the CU will work in the next steps.
  4. Performance wise the NU & CU work best at around twenty (20) meters between them, this will vary depending on your building, some could be over 40 meters, some less then 15 meters, so place the CU now away from NU progressively looking at getting the number for the NU as high as possible, then take it that bit further where it fails (to far from the NU), it is good to know how far you can push the CU. Now the distance you took the CU to where it failed, use that as a guide to bringing the CU back into range, then bring the CU back some more, the CU will be more stable close than further away, when the CU is on the fringe, it can drop out causing your mobile connection to fail intermittently.

Just using these steps often achieves better performance than the performance specifications given for the Cel-Fi.

*Please note, while all care has been taken in compiling BIRRR documents, we recommend that you check with your service provider, equipment provider and installer regarding your own connection issues and equipment needed. Please ensure that any installer is accredited and licensed and that any equipment is legal to use in Australia.

Updated 1st August 2020

Enhancing Mobile Broadband Service

This article is a resource for people seeking information on mobile broadband services in Australia. Mobile Broadband is a different technology to NBN Fixed Wireless.

Screen Shot 2015-11-12 at 9.26.19 PM

This guide covers information relating to:

  • mobile terminology
  • how to enhance mobile coverage, and other resources.

Connecting to Mobile Networks in the Rural Environment

STEP 1: Locate your local tower: to find your closest tower using the following link:

RFNSA

The following online guides are recommended for  a step by step process to finding towers near you. The two guides below each take a slightly different approach at some steps, so read both and work out what works best for you.

Telco Antennas Tower Locating

On Wireless Finding Mobile Phone Towers 

Australian mobile bands and frequencies available in 2020:

frequencies
Ref: Australian Mobile Phone Frequencies

The carrier bandwidth is the single greatest determinate of how fast the mobile data service may operate. There are other factors such as signal strength, Carrier Aggregation and frequency of operation that also affect the speed of service and the distance that the service may be available from the tower.

Screen Shot 2020-08-02 at 11.53.44 AM
Australian Mobile Phone Providers & Networks Used

The Coverage Maps of each Australian mobile carrier can be found here:

Telstra

Optus

Vodafone

The following Australian Mobile Network Guides are useful guides on how to enhance and improve your mobile service:

Guide to Improving Mobile Signal

Guide to Improving Mobile Speeds

Guide to improving Mobile Reception

A desktop site survey can assist you with determining if there is mobile reception in your area and what equipment might be needed to connected.

Telco Antennas desktop site survey cost is $99.

One Wireless desktop site survey cost is $99.

The above businesses can then put you in touch with a specialist in your area who understands the requirements for your state. The report will advise likely signal levels, the sort of mobile services available, the best antenna and extension device for your location and where to point your antenna.

STEP 2: Select the Correct Equipment

See the BIRRR Guide on Selecting the Correct Antenna & How to Point It

Telco Antennas also provide information on antenna and network extension specialists throughout Australia. Please contact them directly for advice on equipment and installers.

What is Legal ?

If you can get some mobile coverage at your location, a network extension device may assist you in boosting your signal.

Passive antennas are usually mounted on the roof (e.g. yagi antennas) and do not require licensing.

Active antennas such as the Celfi’s and Smart Antennas (that require power) do require licensing.  If they are not licensed they are ILLEGAL boosters.

Illegal boosters carry a large fine as they can interfere with the mobile network.

” It is an offence under the Radiocommunications Act 1992 (the Act) to operate an unlicensed radiocommunications device, or possess this device for the purpose of operation. A person found guilty of this offence may be imprisoned for two years for each offence. A body corporate may receive a penalty of up to $270,000 (1,500 penalty units) per offence (sections 46 and 47 of the Act). Other penalties may apply, such as the interference offence provisions at Part 4.2 of the Act.” ( ACMA )

Still need more info ? Check out Telco Antennas Frequently Asked Questions

How to extend a mobile data service from a mobile reception location (hill etc) to home

A solar transponder or a mobile data relay may be installed to relay internet from a mobile friendly location on your property back to your home. Here is one DIY example

12132618_10207831944658546_5477522077073363806_o

*Please note, while all care has been taken in compiling BIRRR documents, we recommend that you check with your equipment supplier, installer and service provider regarding your own connection issues and equipment needed. Please ensure that your installer is accredited and licensed and all equipment used is legal to use in Australia.

Updated 01/08/2020

Controlling Internet Data Usage with Gargoyle Router

Are you regularly running out of internet “downloads” or data? Kids keep on using it all? Not sure where it’s going?
This document describes the process of setting up a “Gargoyle” Router to enforce data usage quotas for each device on your computer network.
Unfortunately, due to the many variables of different internet connection types and equipment types, it is not simple to give a single step-by-step guide, but this may hopefully help some of you out, even if you have to get a computer tech in to set it up for you.
There is a New Zealand company selling Gargoyle routers (posted to Australia), and will help you set them up if you pay for their time.
http://www.portable.geek.nz/
These Gargoyle routers will allow you to set quotas limiting how much data each device on your network can use over a given time period, so as to ensure you do not use all of your monthly internet allowance. You can see how much data each device is using, and set limits for each device. These limits can reset every hour, every day, every week, or every month, and can be set differently for different devices on your network.
The Gargoyle program is free, and can be downloaded from Gargoyle , however you need a special router to put it on, and this can be a bit tricky for those who are not experienced with computer networking.
IMPORTANT – PLEASE READ: You, and you alone are responsible for what you do with this information. It has the potential to stop your internet from working, and to destroy your new Gargoyle router. BIRRR & I are not responsible for this, and cannot necessarily help you fix any problems occurring as a result of this. This is complicated stuff, and you may need help from an experienced computer tech to get it working.
Due to the large amount of possible modems, routers and network types, I cannot give step-by-step instructions for every router available. However the Gargoyle website provides some instructions for the TP-Link TL-WR1043ND Router, which is fairly cheap (about $70) and can be purchased from many online retailers, and maybe your local computer shop or IT Technician, who may also be able to assist you with the setup. (But they quite likely will not know of Gargoyle, so you would have to show them the website – http://www.gargoyle-router.com)
Types of Modems/Internet connections
Your setup will also vary depending on the type of internet connection you have. BEFORE YOU START, take note of how everything is plugged in and connected together. Draw pictures, write notes, take photos, whatever is needed to help you put it back as is if you run into trouble.
If you have a modem or router that has an Ethernet port (to take a cable that looks like this),

cable

then it is reasonably easy to make work. If you have satellite, ADSL, Next G Wireless Loop or a Telstra/Bigpond Network Gateway, this is what you should have. When you are finished, It will all be plugged in like this:

gargoyle 1
If not, you will likely need the assistance of someone experienced with computer networking, so I will attempt to provide some examples of how to set it up for them to follow.
If you have a 3G/4G USB Dongle, you will need to get a router to connect the USB dongle to. This will be another separate piece of equipment to purchase. Check out http://ofmodemsandmen.com/ If you do this, you would then end up with the scenario in the drawing above, and can continue setting up Gargoyle. Alternatively, and preferably, if your Gargoyle router has a USB port, you may be able to connect the USB dongle directly to the Gargoyle Router, and use it as the internet source. I have done this once, and it worked quite well. However, Some routers will not supply enough power to the USB dongle for this to work reliably.
You may also have a wifi only device, like the Telstra 4G Wifi modems. I have never tried this, but you should be able to set it up like this:

gargoyle2

Getting Gargoyle installed onto a router

You cannot just use any router, and this page has some links to different options: Gargoyle Router

But, for the sake of this document, let’s go with the TP-Link TL-WR1043ND – it can be purchased from many Australian retailers, look here for places to order it from: Static Ice

There are currently three versions of the TP-Link TL-WR1043ND router, V1.x (old), V2.1 (current) and 3.0 (current). Version 2.1 and V3.0 are identical in appearance.

Version 1 is the oldest. Version 2 is newer and is well proven. Version 3 (latest), may be problematic, as it is not yet directly supported by Gargoyle (at Jan 2016). When buying the TP-Link TL-WR1043ND, check with your supplier to determine which version they can supply.

Note: Here is a link to other routers which run Gargoyle:
https://www.gargoyle-router.com/wiki/doku.php?id=supported_routers_-_tested_routers
It is recommended to select one of the newest routers with a fast CPU and larger RAM / Flash Memory. Atheros AR71XX based Routers have a proven track record with Gargoyle.

You must download and install the specific Gargoyle file for the router you have / bought.
https://www.gargoyle-router.com/download.php
Select the file which ends in … squashfs-factory.bin. This is the correct .bin file to flash your factory firmware router.

For a V1, get this file: V1 FILE   – clicking on file will automatically download it

For a V2, get this file: V2 FILE – clicking on file will automatically download it

Each of these files are about 8mb in size, and should only take, at most, about 5-20 minutes to download, unless your internet is really, really slow.

  1. Save this file onto your computer.
  2. Physically unplug your computer from the internet, or disconnect the wireless.
  3. Connect the router to the power, and to your computer with the supplied network cable:cable
  4. Open up the webpage that controls the router, which should be at either of these addresses: Address 1  or Address 2 – try each of them.
  5. Next, on the menu on the left side of the screen, click System Tools, then Firmware Upgrade. Then click browse, and choose the file you downloaded earlier. Then click Upgrade. (If you get the error message “please choose a file to upgrade”, then rename the firmware file to something shorter (i.e. “gargoyle.bin”) and upload it again)
  6. Wait about 5 minutes then you should be able to open the website http://192.168.1.1/
    If after 5 minutes 192.168.1.1 won’t open, restart both the Gargoyle router and your computer and try again. To restart Gargoyle, just pull the power cable out, then plug it back in. If this doesn’t work, you are going to need to get help from someone experienced with computer networking. Or you can try repeating everything you did earlier.
  7. The Gargoyle website provides a detailed procedure for the initial configuration of your new Gargoyle router. See http://www.gargoyle-router.com/wiki/doku.php?id=getting_started.
    The following steps take you briefly through this procedure.
    1. Log into 192.168.1.1 via your browser. It will ask for a password. The password is password, so type it in and login.
    2. Once logged in, you should see a screen that looks similar to this:
      GargoyleRouterHomePageScreenshot
    3. Click the Connection button on the left side menu.
    4. In the Internet/WAN section, you need to choose DHCP (wired) if Gargoyle is to be connected to your modem via a network cable. This is the default setting and will work with all nbn™ NTU or modem connections scenarios. Choose DHCP (wireless) if it is to be connected by WIFI.
    5. You must turn on and secure the WIFI. Use WPA2 PSK security, set the Access Point SSID (the WIFI name) and the Wireless Channel. Default is Ch 11 is fine. The remainder of the default settings should not need attention at this time.

Plugging it into your computer network

Once that is done, you can connect Gargoyle to your internet modem (either by LAN cable or wirelessly), and connect your computers and other devices, either by cable or WIFI, to Gargoyle, instead of the original modem.

If it is all done right, you should be able to connect to the internet; in which case you are almost done.

NOTE: No devices should be connected directly to your old modem, as they will be bypassing Gargoyle’s quotas. You may need to turn the WIFI off on your old modem, or change the password, to keep kids (and big kids) from bypassing Gargoyle. If there is no connection, re-check everything you have done. Maybe get someone else to have a look, as it is easy to get frustrated and confused, and overlook simple things. Failing that, you may have to get a computer tech to look at it. But, in the meantime, you should be able to go back to your old setup.

Setting up quotasGargoyleSideMenu

But before you do that, you may wish to use Gargoyles bandwidth monitoring feature to determine just which computers on your network are using data and when. See https://www.gargoyle-router.com/wiki/doku.php?id=bandwidth_usage

Now you just need to setup your quotas.

Open the gargoyle router page at http://192.168.1.1 and login. Then, click Firewall in the left side menu, then click Quotas.

Once again there is a good Gargoyle website explanation for setting quotas. See http://www.gargoyle-router.com/wiki/doku.php?id=quotas

The Quota page has a variety of options. Have a play around and set it up as you want. Then click Save Changes. Sometimes you may have to restart the Gargoyle for it to take effect. To do this, navigate to System then Reboot or pull out the power cord, count to 10, then plug it back in.

To monitor the quotas, click Status on the left side menu and then click Quota Usage. This page will show you in real time, how much each device has used.

That’s about it. I hope this helps out some of you.

I am sorry I can’t give more specific instructions. Dependant on your equipment and users there are many variations for how it could be configured.

Here is an interesting read on a similar project using Gargoyle on a satellite service in the USA: http://raisedbyturtles.org/limiting-daily-bandwidth-on-home-router

Prepared by Nick Marlow from Mitiamo IT for BIRRR 4/11/2015 – Updated 6/06/2016.

*Please note, while all care has been taken in compiling BIRRR documents, we recommend that you check with your own IT consultant regarding this and other latest programs and equipment.

Disable Automatic Updates (Mac Desktops & Laptops)

Mac has a handful of features that rely on a constant internet connection, these include the update feature.

OS X El Capitan, (10.11) the latest version of the Mac operating system is approximately a 6GB download.

Operating system software and all apps in the Mac App Store will automatically download and update themselves. However if you have metered internet or are living in a data drought you’ll probably want to stop these updates from downloading in the background.

Automatic app updates are controlled by the Mac App Store. To change the App Store’s settings, go to System Preferences > App Store. You can still enable checking for updates, by ticking the AUTOMATICALLY CHECK FOR UPDATES BOX, and leaving the other boxes blank.

Screen Shot 2015-10-18 at 10.22.11 am

This enables you to update when you have access to the appropriate data needed and allows the system to alert you to new updates available but does not download them without your permission.

NOTE: Install system data files and security updates is recommended to be checked.

When you are ready to install the updates go to System Preferences > App Store>Show Updates.

You can then decide on which updates are the most important and click on UPDATE or UPDATE ALL (if you have the required data available).

Important: If you’re going to use this automatic system update option, be sure that Time Machine backups of the Mac are allowed to be made on a regular schedule. Time Machine will do this automatically as long as it’s setup and the backup drive is available. If you do not make regular backups of your Mac, it is not recommended to use an automated system update installation feature.

Installing via a USB Memory Stick

How you handle Apple IOS updates is going to depend on which update it is.  To install onto a memory stick or external hard drive follow the instructions below.  You might be able to do this when you have access to free wifi or a friend / relative who has a larger data plan than yourself.

  • For major upgrades like 10.11 (e.g. El Capitan) your device will download an installer through the App Store
    • copy the installer file from the computer you downloaded it to, to an external drive
    • It’ll show up in the Applications folder when you download it and you can just move that or right-click and copy/paste it to your external drive
    • You can also use that method to create a bootable disk in case you ever need to reinstall OS X on your computers
  • For the minor updates they’ll be posted to the Apple website
    • you just need to download it from there to your external drive

Please note, while all care has been taken in compiling BIRRR documents, we recommend that you check with your system operator before implementing any changes.  Operating software can also be downloaded at any Apple Store, there may be a charge for this.

Tips shared by BIRRR taken from Apple Chat help, October 2015.  While all care is taken compiling these fact sheets, we advise you check with Apple Support if you have issues or concerns.

Footnote: All information compiled by Amanda Salisbury & Kristy Sparrow for  BIRRR and is current as at 18th October 2015.

What is unmetering and how does it work?

What does Unmetering mean ?

Some Providers are offering what is referred to un-metered data, this means that any data you use will not be counted against your actual data allowance. While no unmetered access is offered on satellite connections, some ISPs like SkyMesh, iiNet, Optus and Telstra (Bigpond) offer certain services that are not counted as part of your data allowance.

These are some common questions and answers:

What ISPs offer Unmetered services?

  • Skymesh (for NBN Fixed Wireless and NBN Fibre – Netflix content delivered over Australian peering links will not be counted against your data allowance. You have to be an Australian Netflix subscriber)
  • iiNet ( See here for details)
  • Internode (See here for details)
  • Telstra/Bigpond (See here for details)

Freezone

The Freezone offers a range of video and radio content for iiNet, Westnet, Netspace, Internode and Adam Internet customers to enjoy without taking a hit to their monthly quota. Everything from movies, music, sports and gaming content is available along with several live streamed events throughout the year.

Netflix

Skymesh, iiNet and Internode offer unmetered access to Netflix in Australia on Fixed Line NBN and Fixed Wireless NBN. In the Case of iiNet and Internode this is also offered on standard ADSL bundles (Not Naked DSL connections).  Netflix works on a per month subscription payment.

Presto

Telstra offers unmetered access to Presto and a variety of services,  detailed in the link above, on Bigpond Wireless Broadband, Telstra Home Broadband (including NBN FTTX and ADSL).  Presto works on a per month subscription payment.

presto
Presto unmetering shown in yellow on a Bigpond Usage Chart

Bigpond Movies

Bigpond Movies is unmetered for Bigpond customers, movies need to be purchased (rented) individually , however downloads are free.

Some movies are also free on Thanks Thursdays

NB: Whenever you see the BigPond Unmetered icon (green dot), download as much as you like and it won’t count towards your monthly usage limit.  Please note that the Green Dot may not be on all pages,

Education Sites Telstra/Bigpond

Telstra/Bigpond also offer unmetered access to some distance education sites and Portals:

A letter written to ICPA Federal (Isolated Parent’s Childrens’ Association) from Telstra Country Wide re unmetering education websites used by distance education students.

Telstra is committed to listen, learn and respond as positively as possible to issues raised by the ICPA. In this day and age, the internet is a vital source for students and in a country the size of Australia, there are geographical, capacity and commercial realities why it’s not possible to provide the full range of broadband services in some regional and remote locations. What we can do is help families better manage their broadband allowances. From 1 September 2015, Telstra will be un-metering a number of key Education websites for all BigPond and Telstra Mobile Broadband users.

This is on top of the 21 sites that are already unmetered. This was in response to a motion made at last year’s conference and following a visit by Andrew Coull and the Telstra Country Wide team to the Alpha region in Queensland where ICPA members and local families talked about what was most important to them.

To address one of the challenges regional and remote communities face in order to provide children with the best possible tools and support to further their education, Telstra is adding value to their broadband allowance through the un-metering of educational websites. These sites were identified with the ICPA and relevant Departments of Education. We may change sites from unmetered to metered at any time. Of course, as these are new unmetered sites, we don’t expect to make changes anytime soon.

Unmetering Terms & Conditions
On and from 1 September  2015 unless otherwise advised, a number of key education websites will be unmetered.
Some of the key sites include:
Queensland Department of Education and Training (e.g. det.qld.gov.au, education.qld.gov.au)*
WA Department of Education and Training (e.g. http://det.wa.edu.au/*)
SA Department for Education & Child Development (www.centra.sa.edu.au)
Creative Generation (www.creativegeneration.deta.qld.gov.au)
Scootle Community (https://www.scootle.edu.au)
Moodle (http://Moodle.openaccess.edu.au)
When accessing these sites, Telstra Mobile Broadband users, as well as BigPond Broadband Members on ADSL, Cable or Mobile Broadband plans (excluding hourly plans), can access downloads, video streams and editorial content without affecting their monthly usage limit. Note that the un-metering does not apply to Telstra Satellite users.

Please note that unmetering won’t apply if you’re accessing the internet using International Roaming. Additionally, some elements of an unmetered site may be metered if they are sourced from other websites that are metered, including things such as advertisements, YouTube videos, Google maps or social media services. Every time you visit or refresh a page you will incur the download of that content.

Kind regards
Libby Dalton
Executive Officer | Telstra Country Wide

Note: BIRRR have been working with Telstra Country Wide to ensure elearn and iconnect are included on the unmetering list for QLD distance education students. As of 4th term 2015 these sites were unmetered however changes have been made in early 2016, if QLD families find themselves ‘shaped’ whilst these sites are being worked through please contact BIRRR ~ birrraus@gmail.com  For further information contact the department of education in your state.

UPDATED February 2016

  • These sites were identified in consultation with the ICPA and a number of Departments of Education.  We will continue to monitor and refine the websites included and make changes from unmetered to metered as appropriate.

The sites below are in addition to those already unmetered as listed on Telstra.com (https://www.telstra.com.au/support/category/broadband/manage/bigpond-unmetered-sites).

SITE IP ADDRESS UNMETERED
elearn.eq.edu.au 203.104.8.81, 203.104.12.58
iconnect.eq.edu.au 203.104.8.82, 203.104.12.82, 203.104.12.58, 203.104.12.59, 203.104.12.60, 203.104.12.61
learningplace.eq.edu.au 203.104.8.83, 203.104.12.80, 203.104.12.90, 203.104.12.91, 203.104.8.80
iconnect-06.eq.edu.au 203.104.8.58, 203.104.12.58
iconnect-07.eq.edu.au 203.104.8.59, 203.104.12.59
iconnect-08.eq.edu.au 203.104.8.60, 203.104.12.60
staff.learningplace.eq.edu.au 203.104.8.90, 203.104.12.91
students.learningplace.eq.edu.au 203.104.8.91, 203.104.12.91
iconnect-09.eq.edu.au 203.104.8.61, 203.104.12.61
www.centra.sa.edu.au 203.122.254.35
www.centra.sa.edu.au 203.122.255.228
www.centra.sa.edu.au 203.122.254.36
www.centra.sa.edu.au 203.122.254.45
http://Moodle.openaccess.edu.au 221.121.151.143
https://www.scootle.edu.au 182.255.102.66
http://det.wa.edu.au/* 203.14.52.90
hrmisdev.det.wa.edu.au 203.14.52.104
itu.det.wa.edu.au
jobs.det.wa.edu.au
portlets.det.wa.edu.au
schoolsplus.det.wa.edu.au
scripts.det.wa.edu.au
swandeo.det.wa.edu.au
womeninleadership.det.wa.edu.au
http://education.wa.edu.au/*
biggerpicture.education.wa.edu.au
http://webcollaboration.det.wa.edu.au/*
http://portal.det.wa.edu.au/* 203.14.53.48
http://carnarvonsota.wa.edu.au/ * 129.94.183.231


So How does the Unmetering work?

It’s very simple, assume you have a Telstra Bigpond wireless plan with 4GB of data. You browse to Presto.com.au and start watching a whole heap of movies to the amount of 10GB, and then you browse to say youtube.com and use 3GB of data on Videos.

Telstra will calculate your actual usage to be:

  • 3000mb (3gb) of 4gb used (while viewing YouTube) +
  • 10gb of unmetered content (while viewing Presto) for a total of
  • 13gb used but only billed for 3gb, leaving with 1gb of metered data for the rest of the month.

Once you use that 1gb of data, then your service will be slowed down (shaped) to 64kbps which is as fast as dial-up. Unmetered content will also unfortunately be shaped.

Remember with bigpond you are free to change plans once a month to reflect your usage habits. However the highest plan currently available is 25GB.

Why Not satellite services as well?

Unfortunately, the cost of providing a satellite service to a consumer or business, added in the limited amount of backhaul (backhaul is like a very heavy freight train, the more locomotives at the front the more wagons it can pull) available, means it is not affordable to provide this service.


*Please note, while all care has been taken in compiling BIRRR documents, we recommend that you check with your ISP regarding unmetering.  As the #datadrought mainly impacts mobile broadband and satellite customers we have focussed on unmetering for these technologies.  Your provider may have other sites that are unmetered.  Thanks to BIRRR members  Julie Stott & Kye Rosendale for assistance in compiling this document.  


Telstra Essential Contacts

If you need to contact Telstra please ring the correct department, it will result in quicker problem solving.  Get to know your plan, look on your bill are you a business or residential customer?

Telstra Country Wide have a dedicated website for rural, regional & remote users.

TELSTRA FAULTS

  • Phone: 13 2200 for Residential, 13 2000 for Business for faults, antennas, equipment and plans etc (for all faults other than RRADIO & NGWL faults – see below).
  • Fixed home phone faults – call 13 22 03
  • Online Chat Now landing here
  • Troubleshoot and report online here

Radio Phones & NGWL Services
1800 772 346 (1800 R RADIO) or  1800 696 495 (1800 MYNGWL), for customers using radio and NGWL services to report service difficulties or faults. There is also a dedicated email address (rradio@team.telstra.com) for online fault reporting.

Mobile Assurance Team
Mobile Assurance provides support to Pre-Paid, Consumer, Telstra Business and Telstra Enterprise & Government customers. They operate 24/7, and assist customers who are experiencing mobile and wireless service difficulties and faults.
Consumer customers:  13 2200
Business customers:  13 2000

Footnote:
All information compiled from BIRRR discussions with Telstra and Telstra website and is current as at 01/09/2020

TELSTRA Contacts DOCUMENT prepared by Kristy Sparrow for BIRRR 

Telstra Coverage Extension Devices

If you can get some Telstra mobile coverage at your location a Telstra Extension Device may assist you in boosting your signal.

Screen Shot 2020-08-02 at 11.35.56 AM

Network coverage extension devices amplify the network signal your mobile device receives, which extends the area that your device can work in.

This devices can help you connect to the Telstra Mobile Network from further away than normally possible, or in areas where signal may struggle to penetrate – such as indoors, or in hilly or dense terrain.

CHECK TELSTRA COVERAGE HERE  

Mobile broadband network coverage extension devices are also known as ‘repeaters’ as they repeat the signal from one location to another.

In contrast, network coverage extension devices that connect directly to a mobile device are often called external antennas. They are described by their power or ‘gain’, which is a measure of how much they can amplify the mobile signal.

Both of the Telstra Go Repeater and Telstra Smart Antenna products below have been tested, authorised and approved by Telstra for use on the Telstra Mobile Network.

Telstra will be switching off 3G in 2024. With this in mind BIRRR does not recommend spending large amounts of money on boosting 3G service. 3G is being replaced with 4G (if spending any money on antennas or repeating equipment please ensure these are 4G compatible) and also be aware that boosting 3G service may not deliver faster speeds or reliability.

NB:  Extension devices are carrier specific, if you require coverage across multiple carriers then you will need multiple models. This page lists only Telstra branded extension devices.

Telstra Network Coverage Devices:

This slideshow requires JavaScript.

Telstra Smart Antenna RRP $1080

Telstra Go Smart Vehicle Mobile Repeater RRP $864

Telstra Go Stationary Repeater RRP $816

*Professional installation may require additional charges. Prices correct as of 1st August 2020.

BIRRR highly recommend using surge protectors with these devices and a UPS unit to power the repeater during general mains power failures or when the generator is off. They’re designed to power a desktop for 15 minutes or so, but are large enough to power a CelFi repeater for much longer.

** After 3G switch off these devices will continue to operate but only with 4G (700 MHz, 1800 MHz).

Telstra Recommended Antennas:

This slideshow requires JavaScript.

For further information on Telstra recommended extension devices or to have them professionally installed contact the Telstra Mobile Assurances Team:

Phone: 1800 305 307

or visit Telstra Network Extension Devices

Contact the Telstra Regional Australia Team if you require help with coverage at your address and to check your options for mobile extension devices.


The above information has been provided by discussions with Telstra, other service providers also offer solutions for boosting signal strength, please be aware that these must be registered devices.  It is best to contact your service provider directly.  Illegal boosters carry a large fine as they can interfere with the mobile network.

” It is an offence under the Radiocommunications Act 1992 (the Act) to operate an unlicensed radiocommunications device, or possess this device for the purpose of operation. A person found guilty of this offence may be imprisoned for two years for each offence. A body corporate may receive a penalty of up to $270,000 (1,500 penalty units) per offence (sections 46 and 47 of the Act). Other penalties may apply, such as the interference offence provisions at Part 4.2 of the Act.” ( ACMA )

REPORT A PROHIBITED DEVICE ~ If you are aware of anyone having these prohibited devices, you can:

  • call the ACMA’s customer service centre on 1300 850 115
  • email ACMA at info@acma.gov.au

Footnote: All information compiled from BIRRR discussions with Telstra and Telstra website and is current as at 1st August 2020. 


NBN Sky Muster Satellite – the Facts

img_4434

Every residence in Australia will be able to access some form of NBN – either FIXED, FIXED WIRELESS or SATELLITE (also referred to as LTSS and Sky Muster) by 2020.  Sky Muster (Satellite) services became available in April 2016, interim nbn satellite services (ISS) have now ceased.

You can see what type of nbn you are mapped for here: NBN Rollout MAP

NBN Sky Muster Explained

There is lots of misinformation and myths surrounding the nbn rollout, you can read about some of them here:   Myths About NBN Sky Muster 

REMEMBER:

  • Every Australian residence will be eligible for a nbn connection – even if you live really remotely.
  • If you are currently using another form of internet such as mobile broadband, you are still eligible for nbn.
  • Each residence is mapped for nbn, even if you have several houses on your property.
  • If you are receiving an nbn Fixed Wireless or Satellite service, please keep your traditional landline, you do NOT have to switch your voice service, regardless of what you may be told by your existing provider.
  • Sky Muster performs very differently to the old interim satellite. The interim satellite (ISS) had approximately 48,000 subscribers – larger-than-planned-for data plans were sold and the satellite became oversubscribed resulting in the FAIR USE POLICY and reduced data and speeds for users.  The LTSS has 30 x the capacity of the ISS.                                                                          
  • HOW TO CONNECT

nbn Sky Muster Satellite connections are available now.

Choose your Sky Muster provider here.

Read our Preparing for Sky Muster document.

  • ELIGIBILITY CRITERIA  

NBN satellite services are designed to provide internet services to homes and businesses that fall outside of the fixed line and fixed wireless areas in Australia and its external territories.   The new NBN satellite (LTSS/Skymuster) will reach  homes and businesses residing in the most isolated parts of Australia, including the outback and remote offshore territories. Homes and businesses must be within the satellite footprint.

NBN have allowed for additional capacity in case of more subscribers than expected. A second satellite (launched in October 2016) offers future capacity cover. The Sky Muster Satellites have a life span of around 16 years.

  • DATA & PRICING  

Data Limits are up to individual RSP’s (service providers) in line with nbn fair use policy.  Internet service providers set the prices for the services available. NBN sets prices at the wholesale level and the uniform national wholesale price of $24 a month is the same for the basic 12Mbps service across fixed line/wireless/satellite.   Check out the BIRRR comparison of Sky Muster providers to see what data allowances you can access. As of 01/12/23 nbn Sky Muster Providers now offer unlimited data plans across three speed tiers – 25/5, 50/10 and 100/20.

  • nbn SKY MUSTER FAIR USE POLICY                     

The nbn™ Sky Muster™ satellite service Fair Use Policy is in place to help ensure fair access to the service – especially during peak usage times. This Fair Use Policy applies between nbn and the provider.

Your provider will likely have a separate Fair Use Policy which applies to your premises – as satellite capacity is a limited resource. Some providers may have less capacity, which may not be noticed during off-peak times. But during peak hours, when there is more traffic, congestion may occur if your provider does not have enough network capacity- this can lead to slower speeds and the occasional ‘buffering’. 

NB: nbn Sky Muster Plus and Plus Premium plans are entirely managed by nbn and thus do not have provider related congestion/management.

  • SPEED

Sky Muster has delivered significantly improved speeds and capacity to remote and regional areas compared to what was previously available on the Interim Satellite Service (ISS). A Fair Use Policy applies on the service to ensure that performance and quality of service standards are not degraded by high-volume users. Sky Muster offers peak wholesale download speeds of up to 100Mbps and upload speeds of up to 20Mbps. Consult with your provider as to what speed tier will best suit you.

Speeds actually achieved over the Sky Muster network, depend on the technology over which services are delivered to premises and some factors outside nbn control like equipment quality, software, broadband plans and how the end user’s service provider designs its network.

  • EQUIPMENT

Once you place an order for Sky Muster with your chosen provider, a nbn technician will make an appointment to install the  equipment needed (a roof or pole mounted dish and an internal modem).    A standard installation of the equipment is currently free. However, end users should ask their preferred provider if they have any other fees such as activation fees or fees for routers etc as each provider currently differs.  If you require wifi from your Sky Muster service you will need to have a compatible router, contact your provider to discuss your options.

SM1

  • VOICE

Homes and businesses with Sky Muster connections can use VoIP services, if this is supported by their retail service provider. However unlike the fibre offering, the satellite terminating box inside a premises doesn’t include a port to plug in a phone. You will need a router to plug in your VOIP compatible phone. When ordering a VOiP plan on nbn Sky Muster it is important to ask your provider to ensure TC1 (voice prioritisation) is activated.

It is important to remember copper and traditional phone services (such as HCRC, Radio phones & NGWL) will still be maintained in areas to be served by fixed wireless and satellite, so customers have the option of retaining their existing phone service.  BIRRR recommends keeping your existing landline.

Footnote: All information compiled from BIRRR discussions with NBN contacts & NBN website, and is current as at 04/01/24

NBN SKY MUSTER FACTS DOCUMENT prepared by Kristy Sparrow for BIRRR updated 04/01/24

Malware and Spyware Removal Tips for BIRRR Members

A Big thanks to Alan from ‘Smedley’s Engineers – Bits & Bytes’ for providing the following information on Spyware and Malware for Windows users. It will work for all versions of Windows from XP on up to Windows 10.  The use of some free and definitely safe applications and methods listed below can assist in removal of Malware and Spyware that can cause unwanted, unusual and excessive data usage.

These notes are based on experience in dealing with system performance issues and malware, virus and other infestation over a number of years and from shared and sharing of that experience with other Windows support professionals.

Download the following three applications that are all freely available from the: www.bleepingcomputer.com web site. Download them all before executing any of them. I recommend that the three applications be run in the order listed. Also it is important to run them all in order as only partially completing the steps may take your system off-line. At the end a reboot of the system initiated by Adwcleaner is an absolutely essential step.

Save any open work before proceeding.

There are detailed descriptions of each utility on the same page and more technical details of each ore available on their home pages.

Using the “Download Now” will get you the most current version of each one. The http://www.bleepingcomputer.com web pages also list other utilities that may be needed in more complex infestations but these are the three that I use almost all of the time.

JRT – Junkware Removal Tool 

  1. Save it to a known location on your computer.
  2. Execute the JRT.exe once it has completed downloading. It is a Command Line interface, it checks itself to verify that the newest version is being run and will update itself if necessary.
  3. Follow the prompt to press any key to continue. If “System Restore” is disabled the creation of a “System Restore Point” creation will fail. The application may show some commands that it cannot perform. This is dependant of the individual system configuration. As JRT runs it may stop any already running processes including open web browsers.
  4. Once it has finished it will produce a notepad txt file of the items it has cleaned or eliminated.

Roguekiller 

  1. Save it to a known location on your computer.
  2. Execute the Roguekiller.exe once it has completed downloading. It will run an initial check on the system as well as check that it is the current version.
  3. Once the check has completed press the Scan button to continue. The completed scan will show any Processes, Registry settings, Host file issues, AntiRootkit, Files/Folders, MBR (Master Boot Records) and Web browser items that have issues.
  4. A pop- up screen offers the purchase of the PRO version. It is your choice to subscribe of not. From my experience I select all Processes, Registry settings Host file items but only selectively choose and Web Browser add-ins to be deleted.
  5. Then hit the delete button.
  6. Once completed close the application.

For those who are running an x64 bit Windows system there is a version built for it that is downloadable from the Roguekiller home page at: http://www.adlice.com/software/roguekiller/

Adwcleaner 

  1. Save it to a known location on your computer.
  2. Execute the Adwcleaner.exe once it has completed downloading.
  3. Press the Scan button to continue.
  4. Once the scan is completed press the Cleaning button.
  5. This will be followed by three OK buttons.These close all running applications and will reboot the system. This is essential in the cleaning process as it can leave your system off line if not completed. So save any open work first.
  6. Once the system has rebooted a notepad txt file listing the items found and fixed by Adwcleaner will be shown on the screen.

Making it a habit to run these three utilities on a regular basis from the previously downloaded files will assist in keeping your system free of malware unwanted or uninvited infestations. Each application checks itself to verify that you are using the most current version.

Note: Alan supports individual and small business users as a part of his Smedley’s Engineers Pty Ltd business and if BIRRR members are in real strife with their Windows systems and wanting remote support he is happy to assist.  Alan has clients all over Australia and Internationally on systems he never actually gets to see.

Operating in the Hinterland of the Central Coast of NSW

Alan RG Smedley | 0419 919 969 | alan@smedleys.net.au