What does Unmetering mean ?
Some Providers are offering what is referred to un-metered data, this means that any data you use will not be counted against your actual data allowance. While no unmetered access is offered on satellite connections, some ISPs like SkyMesh, iiNet, Optus and Telstra (Bigpond) offer certain services that are not counted as part of your data allowance.
These are some common questions and answers:
What ISPs offer Unmetered services?
- Skymesh (for NBN Fixed Wireless and NBN Fibre – Netflix content delivered over Australian peering links will not be counted against your data allowance. You have to be an Australian Netflix subscriber)
- iiNet ( See here for details)
- Internode (See here for details)
- Telstra/Bigpond (See here for details)
The Freezone offers a range of video and radio content for iiNet, Westnet, Netspace, Internode and Adam Internet customers to enjoy without taking a hit to their monthly quota. Everything from movies, music, sports and gaming content is available along with several live streamed events throughout the year.
Skymesh, iiNet and Internode offer unmetered access to Netflix in Australia on Fixed Line NBN and Fixed Wireless NBN. In the Case of iiNet and Internode this is also offered on standard ADSL bundles (Not Naked DSL connections). Netflix works on a per month subscription payment.
Telstra offers unmetered access to Presto and a variety of services, detailed in the link above, on Bigpond Wireless Broadband, Telstra Home Broadband (including NBN FTTX and ADSL). Presto works on a per month subscription payment.
Bigpond Movies is unmetered for Bigpond customers, movies need to be purchased (rented) individually , however downloads are free.
Some movies are also free on Thanks Thursdays
NB: Whenever you see the BigPond Unmetered icon (green dot), download as much as you like and it won’t count towards your monthly usage limit. Please note that the Green Dot may not be on all pages,
Education Sites Telstra/Bigpond
Telstra/Bigpond also offer unmetered access to some distance education sites and Portals:
A letter written to ICPA Federal (Isolated Parent’s Childrens’ Association) from Telstra Country Wide re unmetering education websites used by distance education students.
Telstra is committed to listen, learn and respond as positively as possible to issues raised by the ICPA. In this day and age, the internet is a vital source for students and in a country the size of Australia, there are geographical, capacity and commercial realities why it’s not possible to provide the full range of broadband services in some regional and remote locations. What we can do is help families better manage their broadband allowances. From 1 September 2015, Telstra will be un-metering a number of key Education websites for all BigPond and Telstra Mobile Broadband users.
This is on top of the 21 sites that are already unmetered. This was in response to a motion made at last year’s conference and following a visit by Andrew Coull and the Telstra Country Wide team to the Alpha region in Queensland where ICPA members and local families talked about what was most important to them.
To address one of the challenges regional and remote communities face in order to provide children with the best possible tools and support to further their education, Telstra is adding value to their broadband allowance through the un-metering of educational websites. These sites were identified with the ICPA and relevant Departments of Education. We may change sites from unmetered to metered at any time. Of course, as these are new unmetered sites, we don’t expect to make changes anytime soon.
Unmetering Terms & Conditions
On and from 1 September 2015 unless otherwise advised, a number of key education websites will be unmetered.
Some of the key sites include:
Queensland Department of Education and Training (e.g. det.qld.gov.au, education.qld.gov.au)*
WA Department of Education and Training (e.g. http://det.wa.edu.au/*)
SA Department for Education & Child Development (www.centra.sa.edu.au)
Creative Generation (www.creativegeneration.deta.qld.gov.au)
Scootle Community (https://www.scootle.edu.au)
Moodle (http://Moodle.openaccess.edu.au)
When accessing these sites, Telstra Mobile Broadband users, as well as BigPond Broadband Members on ADSL, Cable or Mobile Broadband plans (excluding hourly plans), can access downloads, video streams and editorial content without affecting their monthly usage limit. Note that the un-metering does not apply to Telstra Satellite users.
Please note that unmetering won’t apply if you’re accessing the internet using International Roaming. Additionally, some elements of an unmetered site may be metered if they are sourced from other websites that are metered, including things such as advertisements, YouTube videos, Google maps or social media services. Every time you visit or refresh a page you will incur the download of that content.
Kind regards
Libby Dalton
Executive Officer | Telstra Country Wide
Note: BIRRR have been working with Telstra Country Wide to ensure elearn and iconnect are included on the unmetering list for QLD distance education students. As of 4th term 2015 these sites were unmetered however changes have been made in early 2016, if QLD families find themselves ‘shaped’ whilst these sites are being worked through please contact BIRRR ~ birrraus@gmail.com For further information contact the department of education in your state.
UPDATED February 2016
- These sites were identified in consultation with the ICPA and a number of Departments of Education. We will continue to monitor and refine the websites included and make changes from unmetered to metered as appropriate.
The sites below are in addition to those already unmetered as listed on Telstra.com (https://www.telstra.com.au/support/category/broadband/manage/bigpond-unmetered-sites).
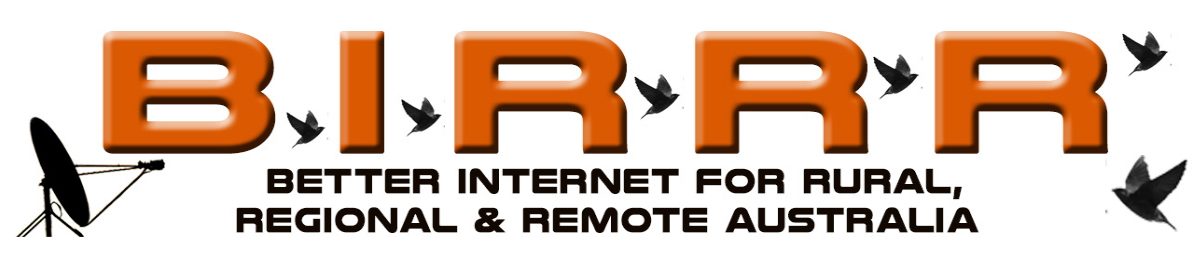
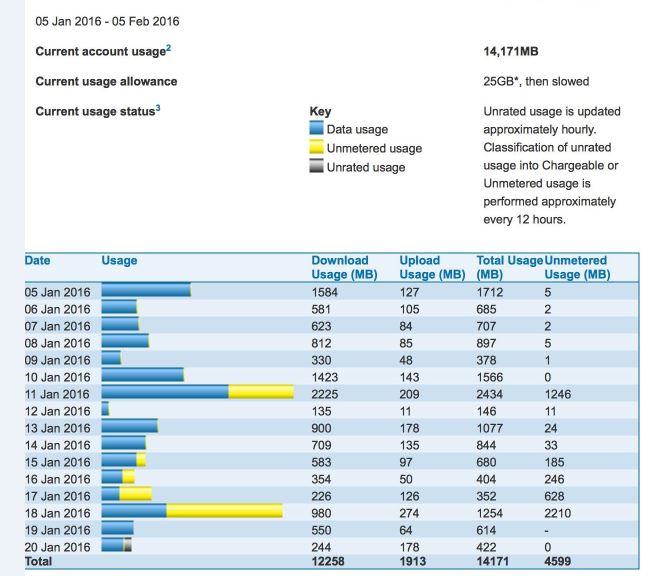
So How does the Unmetering work?
It’s very simple, assume you have a Telstra Bigpond wireless plan with 4GB of data. You browse to Presto.com.au and start watching a whole heap of movies to the amount of 10GB, and then you browse to say youtube.com and use 3GB of data on Videos.
Telstra will calculate your actual usage to be:
- 3000mb (3gb) of 4gb used (while viewing YouTube) +
- 10gb of unmetered content (while viewing Presto) for a total of
- 13gb used but only billed for 3gb, leaving with 1gb of metered data for the rest of the month.
Once you use that 1gb of data, then your service will be slowed down (shaped) to 64kbps which is as fast as dial-up. Unmetered content will also unfortunately be shaped.
Remember with bigpond you are free to change plans once a month to reflect your usage habits. However the highest plan currently available is 25GB.
Why Not satellite services as well?
Unfortunately, the cost of providing a satellite service to a consumer or business, added in the limited amount of backhaul (backhaul is like a very heavy freight train, the more locomotives at the front the more wagons it can pull) available, means it is not affordable to provide this service.
*Please note, while all care has been taken in compiling BIRRR documents, we recommend that you check with your ISP regarding unmetering. As the #datadrought mainly impacts mobile broadband and satellite customers we have focussed on unmetering for these technologies. Your provider may have other sites that are unmetered. Thanks to BIRRR members Julie Stott & Kye Rosendale for assistance in compiling this document.


